Claude Computer Use 工程落地指南:缩放、缓存与思考
Anthropic 发布 Claude Computer Use 工程化落地指南,基于 4.6/4.7 系列模型的内部实测,系统覆盖截图缩放与点击精度、缓存断点布局与滚动缓冲区、服务端自动摘要、思维努力调优、提示注入防御,以及批量工具、顾问模式等实验特性。文中给出大量可运行的代码片段、具体参数阈值与调试方法,适合正在构建长链路桌面/浏览器自动化产品的工程师。
Claude's latest models represent a significant step forward in computer and browser use capabilities. Because of these features, LLMs are now able to power increasingly complex agentic systems that power real work, like building software applications and automating workflows across multiple, disparate technologies.
In this blog post, we share best practices for using Claude with computer and browser use, ranging from simple configuration changes to more advanced integration patterns. We hope this piece helps as you start integrating Claude's computer and browser use capabilities into your product. We are also releasing a new demo implementation which encapsulates some of these best practices and provides additional tools useful for developing on top of Claude's computer use capabilities.
Note that these recommendations apply to the Claude 4.6 family (Opus 4.6, Sonnet 4.6, Haiku 4.5) and Claude Opus 4.7 unless otherwise noted. Where guidance differs between the 4.6 family and Opus 4.7, we call it out inline. Our findings are based on internal experimentation and may be updated in the future as new models and techniques emerge.
Claude 的最新模型在电脑和浏览器使用能力上迈出了重要一步。这些特性使得 LLM 能够驱动日益复杂的代理系统,执行实际工作,例如构建软件应用和跨多种异质技术自动化工作流。
在这篇博文中,我们分享了使用 Claude 进行电脑和浏览器操作的最佳实践,从简单的配置调整到更高级的集成模式。希望本文能帮助你开始将 Claude 的电脑和浏览器使用能力集成到产品中。我们还发布了一个新的演示实现,它封装了这些最佳实践,并为开发基于 Claude 电脑使用能力的产品提供了额外工具。
请注意,除非另有说明,这些建议适用于 Claude 4.6 系列(Opus 4.6、Sonnet 4.6、Haiku 4.5)和 Claude Opus 4.7。当 4.6 系列与 Opus 4.7 的指导不同时,我们会在文中指出。我们的发现基于内部实验,未来可能会随着新模型和技术的出现而更新。
Click accuracy is the foundation of any computer use integration. If clicks don't land where they should, nothing downstream works: forms don't get filled, buttons don't get pressed, and workflows fail. The single highest impact optimization is also one of the simplest: pre downscale your screenshots before sending them to the API.
When you send a screenshot to Claude’s Computer Use API, the model sees it and returns click coordinates in the display_width_px / display_height_px coordinate space you specified. But there's an important constraint: the API has internal processing limits on image size. Images that exceed these limits get downscaled before the model sees them, which means the model is clicking based on a degraded version of the image while your harness expects coordinates aligned to the original resolution.
For our Claude 4.6 model family, the API's limits are:
Max long edge: 1568 pixels
Max total pixels: 1.15 megapixels
Images exceeding either limit get internally downscaled
Our Opus 4.7 model supports higher resolution. The limits are:
Max long edge: 2576 pixels
Max total pixels: 3.75 megapixels
Images exceeding either limit get internally downscaled
When the coordinate space and the model's perceived image don't match, the model's predicted clicks land on a display scale different from the image it's actually seeing. This is the primary cause of click inaccuracy at high resolutions. The fix is straightforward: always downscale your screenshots to fit within these limits before sending them to the API. We consistently observe significant accuracy degradation when images exceed the limits, and this single change is worth more than almost any other optimization.
点击精度是任何电脑使用集成的基础。如果点击没有落在应有的位置,下游的一切都会失败:表单无法填写、按钮无法按下、工作流中断。单一影响最大的优化也是最简单的一项:在将截图发送到 API 之前进行预先缩小。
当你向 Claude 的 Computer Use API 发送截图时,模型会看到这张图,并在你指定的 display_width_px / display_height_px 坐标系中返回点击坐标。但有一个重要限制:API 对图像大小有内部处理上限。超过这些上限的图像会在模型看到之前被内部缩放,这意味着模型基于降级版本的图像进行点击,而你的编排代码却期望坐标与原始分辨率对齐。
对于 Claude 4.6 模型系列,API 的限制为:
最大长边:1568 像素
最大总像素:1.15 百万像素
超出任一限制的图像会被内部缩放
Opus 4.7 模型支持更高的分辨率。限制为:
最大长边:2576 像素
最大总像素:3.75 百万像素
超出任一限制的图像会被内部缩放
当坐标空间与模型感知到的图像不匹配时,模型预测的点击会落在与实际看到图像不同的显示比例上。这是高分辨率下点击不准确的主要原因。修复方法很简单:在发送到 API 之前,始终将截图缩小到这些限制以内。我们观察到,当图像超出限制时,准确度会显著下降,而这一项更改的价值几乎超过任何其他优化。
Recommended resolutions
Start with 1280x720. This is a safe, practical default for most use cases. It uses about 80% of the pixel budget, stays well within both the long edge and total pixel limits, and is a standard resolution that models have seen during training. It works well for both modern web UIs and legacy desktop applications.
If you are using Opus 4.7, we recommend starting with 1080p, as this brings a meaningful quality lift over 720p and provides a good balance between token use and performance.
For developers who want to maximize the visual information the model receives, we also recommend a "max API fit" approach: computing the optimal resolution per-image based on the source's native aspect ratio:
import math

# 1568 for 4.6 family, 2576 for Opus 4.7
MAX_LONG_EDGE = 1568

# 1.15MP for 4.6 family, 3.75MP for Opus 4.7
MAX_PIXELS = 1_150_000

def compute_max_api_fit(native_w, native_h):
    """Compute the largest resolution that fits API limits
    while preserving aspect ratio."""
    aspect = native_w / native_h

    # Compute max dimensions from pixel budget
    h_from_pixels = math.sqrt(MAX_PIXELS / aspect)
    w_from_pixels = h_from_pixels * aspect

    # Apply long edge constraint
    if native_w >= native_h:
        w = min(w_from_pixels, MAX_LONG_EDGE)
        h = w / aspect
    else:
        h = min(h_from_pixels, MAX_LONG_EDGE)
        w = h * aspect

    # Never upscale beyond native
    w = min(w, native_w)
    h = min(h, native_h)

    return int(w), int(h)
This approach is slightly more complex but avoids aspect ratio distortion and uses the full pixel budget available for each image. The accuracy improvement over a fixed 1280x720 is modest, but it's a straightforward implementation that avoids the distortion that occurs when forcing a 16:9 source into a 4:3 display resolution.
Resolutions to avoid:
Native resolution (unscaled): Unless your source images happen to be below the resolution limits, sending native resolution screenshots is the most common cause of poor click accuracy.
Very low resolutions (below 960x540): With low resolution images, too much detail is lost for the model to accurately identify small UI elements.
If on MacOS: A common issue for browser use is that the screenshots on MacOS are often captured with a device pixel ratio of 2, which means that you can end up with images that are 2x the resolution of the screen coordinates.
If you are on the 4.6 family, avoid 1920x1080 and above: These exceed the pixel limit and will be silently downscaled. On Opus 4.7 the ceiling is higher (3.75 MP), so 1080p and 1440p is within budget; still avoid native 4K without downscaling.
推荐分辨率
从 1280x720 开始。这是大多数场景下安全、实用的默认值。它使用了约 80% 的像素预算,远在长边和总像素限制之内,并且是模型在训练中见过的标准分辨率。它对现代网页 UI 和传统桌面应用都表现良好。
如果你使用 Opus 4.7,我们推荐从 1080p 开始,因为相比 720p 它能带来有意义的画质提升,并在 token 消耗与性能之间取得良好平衡。
对于希望最大化模型接收的视觉信息的开发者,我们还推荐一种“最大 API 适配”方法:根据源图的原生宽高比计算每张图像的最佳分辨率:
import math

# 4.6 系列为 1568,Opus 4.7 为 2576
MAX_LONG_EDGE = 1568

# 4.6 系列为 1.15MP,Opus 4.7 为 3.75MP
MAX_PIXELS = 1_150_000

def compute_max_api_fit(native_w, native_h):
    """计算在 API 限制内且保持宽高比的最大分辨率。"""
    aspect = native_w / native_h
    # 根据像素预算计算最大尺寸
    h_from_pixels = math.sqrt(MAX_PIXELS / aspect)
    w_from_pixels = h_from_pixels * aspect
    # 应用长边限制
    if native_w >= native_h:
        w = min(w_from_pixels, MAX_LONG_EDGE)
        h = w / aspect
    else:
        h = min(h_from_pixels, MAX_LONG_EDGE)
        w = h * aspect
    # 绝不放大超过原生尺寸
    w = min(w, native_w)
    h = min(h, native_h)
    return int(w), int(h)
这种方法稍微复杂一些,但避免了宽高比失真,并充分利用了每张图像可用的像素预算。相比固定的 1280x720,准确度提升不大,但实现直接,避免了对 16:9 源图强制使用 4:3 显示分辨率导致的失真。
应避免的分辨率:
原生分辨率(未缩放):除非你的源图恰好低于分辨率限制,否则发送原生分辨率截图是导致点击准确度差的最常见原因。
非常低的分辨率(低于 960x540):低分辨率图像会丢失过多细节,模型无法准确识别小的 UI 元素。
如果使用 MacOS:浏览器使用的一个常见问题是 MacOS 上的截图通常以设备像素比 2 捕获,这意味着最终得到的图像可能比屏幕坐标分辨率高出 2 倍。
如果你在 4.6 系列上,避免使用 1920x1080 及以上分辨率:这些会超出像素限制并被静默缩放。Opus 4.7 的上限更高(3.75 MP),因此 1080p 和 1440p 在预算内;但仍然要避免未经缩放的 4K 原生分辨率。
When you resize a screenshot before sending it, the model returns click coordinates in the display resolution you specified. You must scale these back to your actual screen resolution before executing the click:
# Your screen is screen_w x screen_h
# You sent a screenshot resized to display_w x display_h
scale_x = screen_w / display_w
scale_y = screen_h / display_h

screen_x = int(api_returned_x * scale_x)
screen_y = int(api_returned_y * scale_y)
This is straightforward but critical, because if you forget to scale or display_width_px / display_height_px don't match the actual dimensions of the image you sent, every click will be consistently offset.
发送截图前调整大小后,模型会在你指定的显示分辨率下返回点击坐标。执行点击前,必须将这些坐标缩放回实际屏幕分辨率:
# 你的屏幕为 screen_w x screen_h
# 你发送的截图已调整为 display_w x display_h
scale_x = screen_w / display_w
scale_y = screen_h / display_h

screen_x = int(api_returned_x * scale_x)
screen_y = int(api_returned_y * scale_y)
这很直接但至关重要,因为如果你忘记缩放,或者 display_width_px / display_height_px 与你发送的图像实际尺寸不匹配,每一次点击都会产生系统性偏移。
When constructing your messages content array, place the text instruction before the image, as depicted in the code snippet below. This lets the model know what it's looking for as it processes the screenshot, which improves click accuracy.
# RECOMMENDED — text instruction first, then screenshot:
content = [
    {"type": "text", "text": "Click on the Submit button"},
    {"type": "image", "source": {"type": "base64", "media_type": "image/png", "data": screenshot_b64}},
]

# NOT RECOMMENDED — image first, then text:
content = [
    {"type": "image", "source": {"type": "base64", "media_type": "image/png", "data": screenshot_b64}},
    {"type": "text", "text": "Click on the Submit button"},
]
构建消息内容数组时,将文本指令放在图像之前,如下方代码片段所示。这让模型在处理截图时就知道要寻找什么,从而提升点击准确度。
# 推荐——文本指令在前,截图在后:
content = [
    {"type": "text", "text": "点击提交按钮"},
    {"type": "image", "source": {"type": "base64", "media_type": "image/png", "data": screenshot_b64}},
]

# 不推荐——图像在前,文本在后:
content = [
    {"type": "image", "source": {"type": "base64", "media_type": "image/png", "data": screenshot_b64}},
    {"type": "text", "text": "点击提交按钮"},
]
If clicks are missing their targets, it often boils down to one of the causes, below:
| Symptom | Likely causes | Try this |
|---|---|---|
| Clicks consistently offset in one direction | display_width_px / display_height_px don't match the actual image dimensions sent; Screenshot exceeds API limits and is being silently downscaled; Content ordering is image-first instead of text-first | Ensure display dimensions exactly match your resized screenshot, not your native resolution; Pre-downscale to 1280x720 or use compute_max_api_fit; Move text instruction before the image in the content array |
| Clicks land in roughly the right area but miss the target | Target is very small (checkbox, icon, toggle); Source image was very high resolution (4K+) and detail was lost during downscaling; Aspect ratio distortion from forcing a non-native aspect ratio | Enable enable_zoom: True for dense UIs; Capture at a lower DPI or crop to the relevant screen region before downscaling; Preserve the source aspect ratio when resizing |
| Model clicks the wrong element entirely | Ambiguous instruction ("click Submit" when multiple submit-like buttons exist); Visually similar elements near the target; UI is too complex for a single instruction | Use more specific prompts with positional context ("click the blue Submit button in the bottom-right of the form"); Break complex interactions into smaller steps; Provide additional context about the page layout |
| Accuracy is poor across the board | Screenshots are being sent above API limits; Source images are from very high-resolution displays (4K+) with extreme compression ratios; Resolution is too low, losing critical detail | Pre-downscale all screenshots to fit within limits; For 4K+ sources on the 4.6 family, Sonnet is more robust to heavy downscaling than Opus 4.6. On Opus 4.7 this gap largely closes, use the 4.7 pixel budget (up to 3.75 MP) so less downscaling is needed in the first place. Try 1280x720 as a baseline; if too lossy, use compute_max_api_fit |
If the model acts unpredictably after trying the fixes above, log the full transcripts and overlay the predicted clicks on the source screenshots to understand what the model is actually seeing and deciding.
Some failures aren't about click accuracy at all. For example, certain dropdown menus may invoke system-level UI that the browser viewport doesn't capture—the model appears to be failing the task, but it simply can't see the menu it needs to interact with. In cases like these, the model should rely on alternative methods such as JavaScript execution, keyboard navigation, or direct document object model (DOM) manipulation rather than clicking.
如果点击未能命中目标,通常可归结为以下原因之一:
| 症状 | 可能原因 | 尝试方案 |
|---|---|---|
| 点击始终朝某个方向偏移 | display_width_px / display_height_px 与发送的图像实际尺寸不匹配;截图超出 API 限制被静默缩放;内容顺序是图像在先而非文本在先 | 确保显示尺寸精确匹配调整后的截图,而非原生分辨率;预缩至 1280x720 或使用 compute_max_api_fit;将文本指令移至图像前 |
| 点击大致落在正确区域但未命中目标 | 目标很小(复选框、图标、开关);源图分辨率极高(4K+),缩放时丢失细节;缩放时强制非原生宽高比导致变形 | 对密集 UI 启用 enable_zoom: True;以较低 DPI 捕获,或缩放前裁剪到相关屏幕区域;缩放时保持源图宽高比 |
| 模型完全点错元素 | 指令含糊(存在多个类似“提交”的按钮时仍说“点击提交”);目标附近有视觉相似元素;单个指令 UI 过于复杂 | 使用带位置描述的具体提示(“点击表单右下角的蓝色提交按钮”);将复杂交互拆分为更小的步骤;提供页面布局的额外背景 |
| 整体准确度差 | 截图以超出 API 限制发送;源图来自极高分辨率显示器(4K+),压缩比极端;分辨率太低丢失关键细节 | 将所有截图预先缩小至限制以内;对于 4.6 系列的 4K+ 源图,Sonnet 比 Opus 4.6 更能适应大比例缩放。Opus 4.7 上这一差距基本消失,利用其 3.75 MP 像素预算来减少缩放需求。先尝试 1280x720;如果画质损失过大,使用 compute_max_api_fit |
尝试上述修复后若模型行为仍不可预测,请记录完整对话记录,并将预测的点击叠加在源截图之上,以理解模型实际看到和决策的内容。
某些失败根本与点击准确度无关。例如,某些下拉菜单可能调用系统级 UI,而浏览器视口无法捕获——模型看似任务失败,其实只是无法看到需要交互的菜单。这种情况下,模型应依赖替代方法,如 JavaScript 执行、键盘导航或直接 DOM 操作,而不是点击。
Based on our internal testing, Claude Sonnet 4.6 tends to be more mechanically precise at clicking (better spatial accuracy, fewer near misses) while Claude Opus 4.6 brings stronger reasoning. Sonnet 4.6 is also more robust when source images require heavy downscaling.
Opus 4.7 narrows this gap: Through testing, we have found its clicking precision is roughly on par with Sonnet 4.6, and its higher resolution budget reduces the amount of downscaling needed in the first place, making it a strong choice when you want Opus-level reasoning paired with strong click accuracy.
For most tasks, we recommend starting with Sonnet 4.6, which provides the best balance of clicking accuracy, reasoning, and cost. Choose Opus 4.7 when you want stronger reasoning, particularly if using high-resolution source images. Haiku 4.5 remains an excellent option when latency is the priority. Advanced workflows may still benefit from an orchestrator + sub-agent pattern where a reasoning model handles planning and decision-making while Sonnet or Haiku executes the mechanical clicking steps.
根据我们的内部测试,Claude Sonnet 4.6 在机械点击方面往往更精确(更好的空间精度,更少的接近失败),而 Claude Opus 4.6 则提供更强的推理能力。Sonnet 4.6 在源图需要大幅缩放时也更为鲁棒。
Opus 4.7 缩小了这一差距:通过测试,我们发现其点击精度大致与 Sonnet 4.6 相当,而且其更高的分辨率预算首先减少了所需的缩放量,使其成为既要 Opus 级别推理又要强点击准确度时的有力选择。
对于大多数任务,我们推荐从 Sonnet 4.6 开始,它在点击准确度、推理和成本之间提供了最佳平衡。需要更强推理时选择 Opus 4.7,特别是使用高分辨率源图时。Haiku 4.5 在延迟优先的场景中仍然是优秀选择。高级工作流可能仍然受益于编排器 + 子代理模式,其中推理模型负责规划和决策,Sonnet 或 Haiku 执行机械点击步骤。
Click accuracy degrades as targets get smaller. Large and medium UI elements (buttons, input fields, and standard menu items) are reliable across all resolutions within the safe zone. The challenge is with small and tiny targets, like checkboxes, system tray icons, dropdown arrows, small toggle switches, and tree view expand/collapse buttons.
If your application involves clicking small targets frequently, consider these strategies:
Use zoom for dense UIs. Claude 4.6 and 4.7 models support a zoom capability that lets the model inspect specific screen regions at higher resolution before clicking. Enable it in your tool configuration:
{
    "type": "computer_20251124",
    "name": "computer",
    "display_width_px": 1280,
    "display_height_px": 720,
    "enable_zoom": True
}
Make targets larger. If you control the UI being automated, increasing the size of click targets (even modestly) has a disproportionate impact on reliability. This might mean using a lower system DPI, zooming in the browser, or adjusting UI scaling settings.
Use keyboard alternatives for tiny targets. For very small elements, such as system tray icons or tiny checkboxes, keyboard shortcuts or tab-based navigation can be more reliable than clicking. If your workflow allows it, prompting the model to use keyboard interactions for specific steps can improve success rates.
Consider source image resolution. Screenshots from 4K+ displays that get compressed down to 720p lose significant detail (for example, a 16px checkbox at 3840x2160 native becomes roughly 5px at 1280x720 display resolution, which makes the target much smaller and therefore more difficult to hit). If you're working with very high-resolution displays, consider using Opus 4.7, which has a higher resolution limit than previous models. If using 4.6 models, consider capturing at a lower DPI, using display scaling to enlarge UI elements, or focusing the screenshot on the relevant portion of the screen rather than the full display. Because these models represent more information with less pixels, we’ve observed that performance degrades as source image scale increases, meaning more compression is needed.
随着目标变小,点击准确度会下降。大型和中型 UI 元素(按钮、输入框、标准菜单项)在安全区内所有分辨率下都可靠。挑战在于小型和极小型目标,例如复选框、系统托盘图标、下拉箭头、小型开关和树视图展开/折叠按钮。
如果你的应用涉及频繁点击小目标,考虑以下策略:
对密集 UI 使用缩放。Claude 4.6 和 4.7 模型支持缩放功能,让模型在点击前以更高分辨率检查特定屏幕区域。在你的工具配置中启用它:
{
    "type": "computer_20251124",
    "name": "computer",
    "display_width_px": 1280,
    "display_height_px": 720,
    "enable_zoom": True
}
让目标更大。如果你能控制被自动化的 UI,增大点击目标的大小(即使幅度不大)对可靠性有显著影响。这可能意味着使用更低的系统 DPI、在浏览器中放大,或调整 UI 缩放设置。
对极小目标使用键盘替代方案。对于非常小的元素,如系统托盘图标或极小的复选框,键盘快捷键或基于 Tab 的导航可能比点击更可靠。如果你的工作流允许,提示模型对特定步骤使用键盘交互可以提高成功率。
考虑源图分辨率。4K+ 显示器的截图压缩到 720p 会丢失大量细节(例如,原生 3840x2160 下的 16px 复选框在 1280x720 显示分辨率下仅约 5px,使目标更小,更难命中)。如果你的显示器分辨率极高,考虑使用 Opus 4.7,它拥有比之前模型更高的分辨率限制。如果使用 4.6 模型,考虑以较低 DPI 捕获、使用显示缩放放大 UI 元素,或将截图聚焦于屏幕相关区域而非全屏。由于这些模型用更少像素表示更多信息,我们观察到随着源图分辨率增大(需要更多压缩),性能会下降。
We experimented on internal evaluations with several popular optimization techniques and did not find consistent uplift from these approaches, though results may vary depending on the specific situation:
Breaking the image into smaller tiles: Splitting a screenshot into quadrants or regions and sending them separately did not improve click accuracy.
Overlaying a grid pattern with coordinates: Adding a visual coordinate grid to screenshots to help the model localize targets did not produce reliable gains.
Resize algorithm choice: PIL LANCZOS, sips, and other common resize algorithms produced identical results. Use whatever is convenient for your stack.
我们在内部评估中尝试了几种流行的优化技术,并未发现这些方法有一致的提升,不过结果可能因具体情况而异:
将图像分割成更小的切片:将截图拆分成象限或区域分别发送并未提高点击准确度。
叠加带有坐标的网格模式:在截图上添加视觉坐标网格以帮助模型定位目标并未产生可靠收益。
缩放算法选择:PIL LANCZOS、sips 和其他常见缩放算法结果相同。使用对你技术栈方便的任何算法。
import math
from PIL import Image
import base64
import io

# 1568 for 4.6 family, 2576 for Opus 4.7
MAX_LONG_EDGE = 1568

# 1.15MP for 4.6 family, 3.75MP for Opus 4.7
MAX_PIXELS = 1_150_000

def prepare_screenshot(screenshot: Image.Image, native_w: int, native_h: int) -> tuple[str, int, int]:
    """Resize a screenshot to fit API limits and return base64 + display dimensions."""
    # Option A: Fixed 720p (simple, reliable)
    display_w, display_h = 1280, 720

    # Option B: Max API fit (maximizes fidelity)
    # display_w, display_h = compute_max_api_fit(native_w, native_h)

    resized = screenshot.resize((display_w, display_h), Image.LANCZOS)

    buffer = io.BytesIO()
    resized.save(buffer, format="PNG")
    b64 = base64.standard_b64encode(buffer.getvalue()).decode()

    return b64, display_w, display_h

def scale_coordinates(api_x: int, api_y: int, display_w: int, display_h: int,
                      screen_w: int, screen_h: int) -> tuple[int, int]:
    """Scale API-returned coordinates back to native screen space."""
    screen_x = int(api_x * (screen_w / display_w))
    screen_y = int(api_y * (screen_h / display_h))
    return screen_x, screen_y

def compute_max_api_fit(native_w: int, native_h: int) -> tuple[int, int]:
    """Compute the largest resolution that fits API limits while preserving aspect ratio."""
    aspect = native_w / native_h
    h_from_pixels = math.sqrt(MAX_PIXELS / aspect)
    w_from_pixels = h_from_pixels * aspect
    if native_w >= native_h:
        w = min(w_from_pixels, MAX_LONG_EDGE)
        h = w / aspect
    else:
        h = min(h_from_pixels, MAX_LONG_EDGE)
        w = h * aspect
    w = min(w, native_w)
    h = min(h, native_h)
    return int(w), int(h)
import anthropic
from PIL import Image

client = anthropic.Anthropic()

# Capture screenshot (your method here)
screenshot = Image.open("screenshot.png")
native_w, native_h = screenshot.size

# Prepare for API
b64, display_w, display_h = prepare_screenshot(screenshot, native_w, native_h)

# Send to Claude — text before image
response = client.beta.messages.create(
    model="claude-sonnet-4-6",
    max_tokens=4096,
    betas=["computer-use-2025-11-24"],
    messages=[{
        "role": "user",
        "content": [
            {"type": "text", "text": "Click on the Submit button"},
            {"type": "image", "source": {"type": "base64", "media_type": "image/png", "data": b64}},
        ]
    }],
    tools=[{
        "type": "computer_20251124",
        "name": "computer",
        "display_width_px": display_w,
        "display_height_px": display_h,
    }],
)

# Scale coordinates back for execution
api_x, api_y = extract_click_coords(response) # your parsing logic
screen_x, screen_y = scale_coordinates(api_x, api_y, display_w, display_h, native_w, native_h)
import math
from PIL import Image
import base64
import io

# 4.6 系列为 1568,Opus 4.7 为 2576
MAX_LONG_EDGE = 1568

# 4.6 系列为 1.15MP,Opus 4.7 为 3.75MP
MAX_PIXELS = 1_150_000

def prepare_screenshot(screenshot: Image.Image, native_w: int, native_h: int) -> tuple[str, int, int]:
    """将截图缩放到 API 限制内,返回 base64 和显示尺寸。"""
    # 方案 A:固定 720p(简单可靠)
    display_w, display_h = 1280, 720

    # 方案 B:最大 API 适配(最大化保真度)
    # display_w, display_h = compute_max_api_fit(native_w, native_h)

    resized = screenshot.resize((display_w, display_h), Image.LANCZOS)

    buffer = io.BytesIO()
    resized.save(buffer, format="PNG")
    b64 = base64.standard_b64encode(buffer.getvalue()).decode()

    return b64, display_w, display_h

def scale_coordinates(api_x: int, api_y: int, display_w: int, display_h: int,
                      screen_w: int, screen_h: int) -> tuple[int, int]:
    """将 API 返回的坐标缩放回原生屏幕空间。"""
    screen_x = int(api_x * (screen_w / display_w))
    screen_y = int(api_y * (screen_h / display_h))
    return screen_x, screen_y

def compute_max_api_fit(native_w: int, native_h: int) -> tuple[int, int]:
    """计算在 API 限制内且保持宽高比的最大分辨率。"""
    aspect = native_w / native_h
    h_from_pixels = math.sqrt(MAX_PIXELS / aspect)
    w_from_pixels = h_from_pixels * aspect
    if native_w >= native_h:
        w = min(w_from_pixels, MAX_LONG_EDGE)
        h = w / aspect
    else:
        h = min(h_from_pixels, MAX_LONG_EDGE)
        w = h * aspect
    w = min(w, native_w)
    h = min(h, native_h)
    return int(w), int(h)
import anthropic
from PIL import Image

client = anthropic.Anthropic()

# 捕获截图(你的方法)
screenshot = Image.open("screenshot.png")
native_w, native_h = screenshot.size

# 准备 API 调用
b64, display_w, display_h = prepare_screenshot(screenshot, native_w, native_h)

# 发送给 Claude——文本在图像之前
response = client.beta.messages.create(
    model="claude-sonnet-4-6",
    max_tokens=4096,
    betas=["computer-use-2025-11-24"],
    messages=[{
        "role": "user",
        "content": [
            {"type": "text", "text": "点击提交按钮"},
            {"type": "image", "source": {"type": "base64", "media_type": "image/png", "data": b64}},
        ]
    }],
    tools=[{
        "type": "computer_20251124",
        "name": "computer",
        "display_width_px": display_w,
        "display_height_px": display_h,
    }],
)

# 缩放坐标以执行操作
api_x, api_y = extract_click_coords(response) # 你的解析逻辑
screen_x, screen_y = scale_coordinates(api_x, api_y, display_w, display_h, native_w, native_h)
Claude's latest models support adaptive thinking, a setting which lets Claude decide how much to reason through intermediate steps before acting. Instead of manually setting a thinking token budget, adaptive thinking lets Claude dynamically determine when and how much to use extended thinking based on the complexity of each request. For computer use, this means Claude can think through what it's seeing on screen, plan multi-step interactions, and self-correct before committing to a click or keystroke.
With adaptive thinking, Claude's thinking depth is controlled via the thinking parameter with an effort level: low, medium, high, xhigh (with Opus 4.7), and max. More thinking means more reasoning per action, but also more output tokens, higher latency, and higher cost.
Claude Opus 4.7
We tested each thinking effort level across a suite of end to end UI automation tasks spanning desktop applications, browsers, and multi-application workflows.
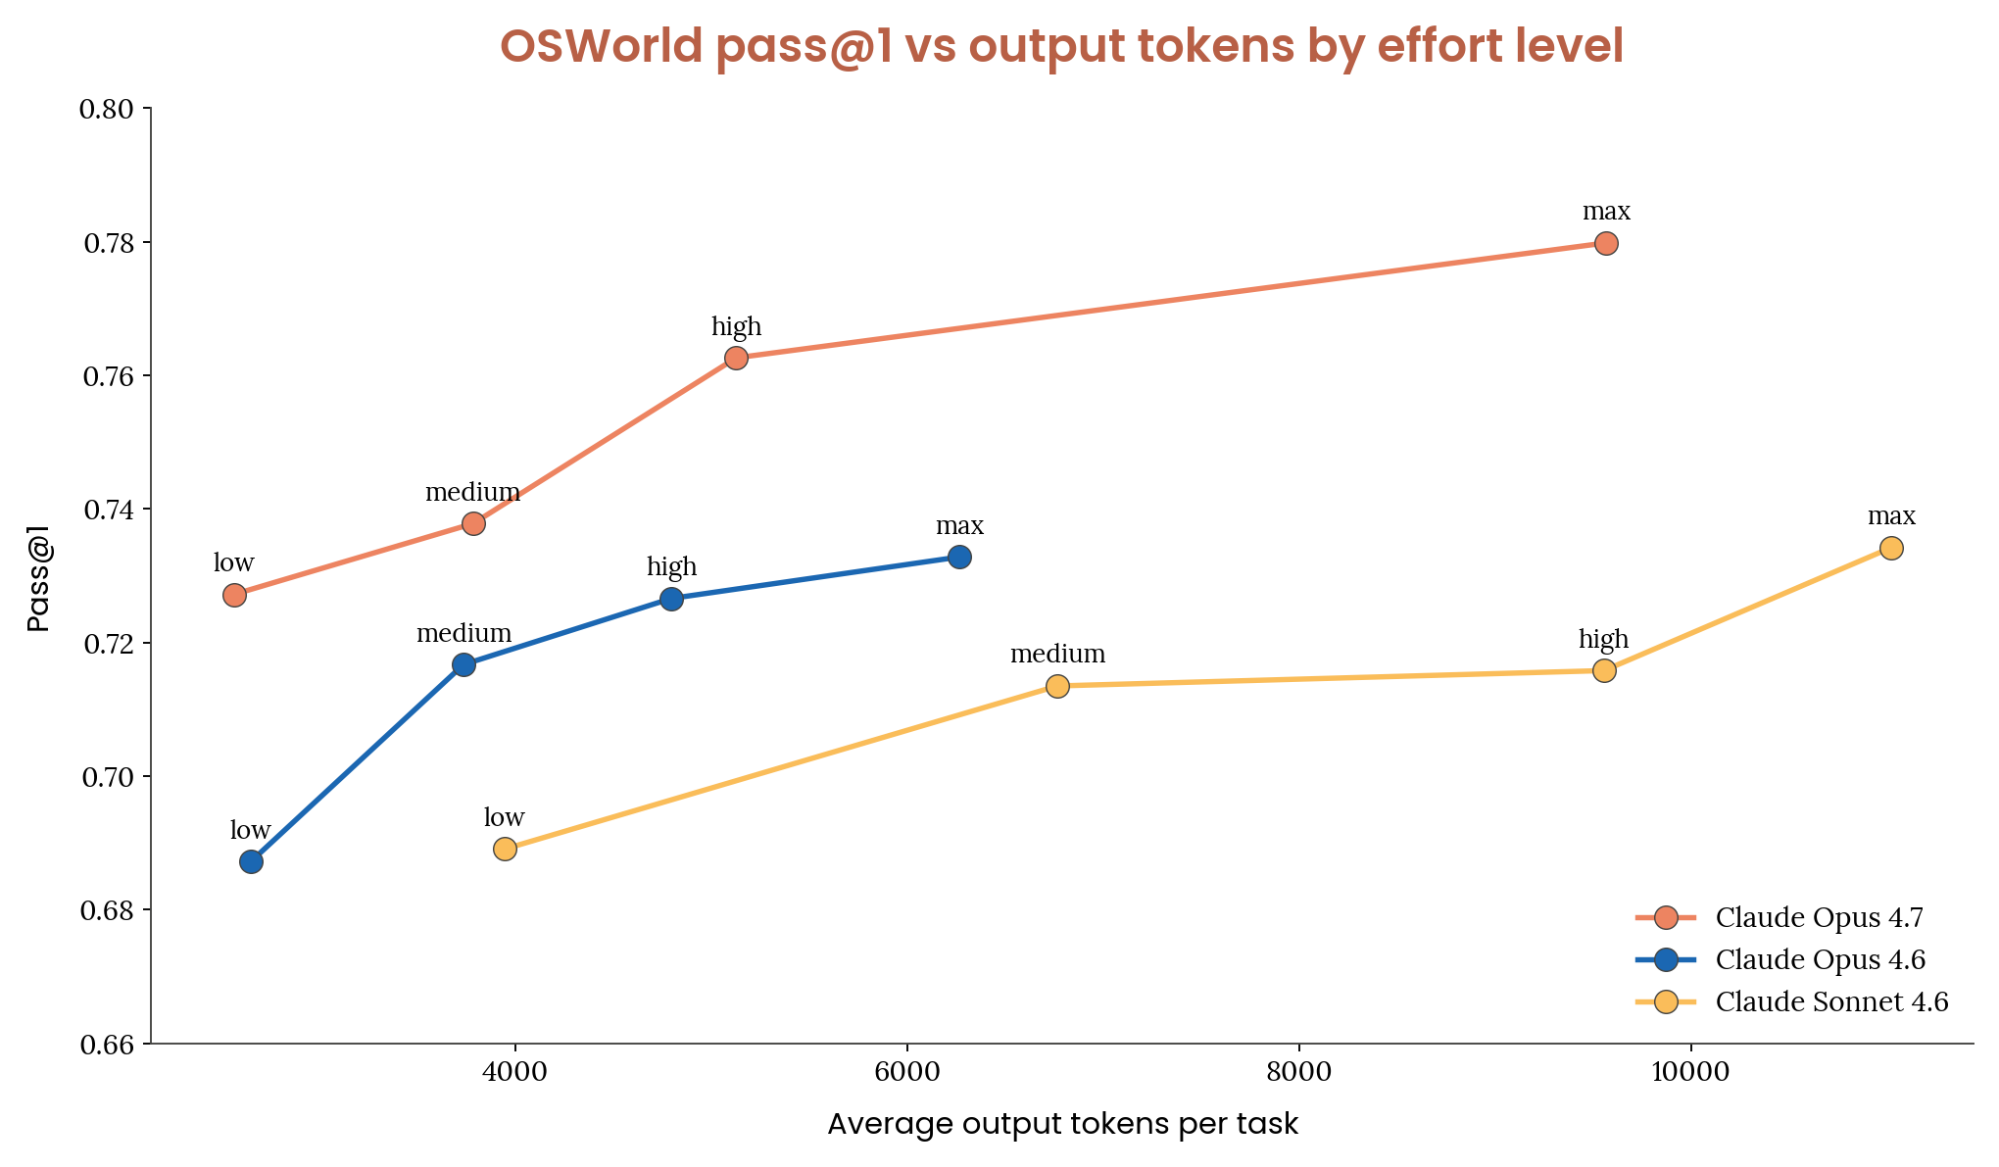
Opus 4.7 outperforms the 4.6 family. On the OSWorld Verified benchmark, we find that Opus outperforms all 4.6 family models at equivalent token usage and effort settings. Opus 4.7 on low effort scores similarly to Sonnet 4.6 on max, while using ~1/10th the tokens per task. For difficult tasks, Opus 4.7 is the obvious choice.
Setting effort to high achieves close to the highest task success rate while using roughly half the output tokens of max. Compared to Opus 4.6, low, medium and high all use approximately the same amount of tokens while improving score on OSWorld. During our internal testing, Max effort used more tokens and provided the best score. The table below outlines our recommendations for when to use each thinking effort level.
| Scenario | Thinking effort | Why |
|---|---|---|
| Default for most use cases | high | Opus 4.7 is best for difficult tasks. Using high will give the model enough reasoning to plan over complex multi-step interactions without significantly increasing token usage. |
| High-throughput / cost-sensitive | low | Lower token usage while providing quality between Opus 4.6's high and max effort settings. |
| Simple, well-defined workflows / fastest | Suggest trying Sonnet 4.6 | Use if low latency is the highest priority. Adequate for short, predictable tasks where the UI is consistent and the workflow is known. |
| Complex, one-shot tasks | max | Use when tasks are highly challenging and you need to get it right on the first attempt. |
Claude 4.6 models
We tested each thinking effort level across a suite of end to end UI automation tasks spanning desktop applications, browsers, and multi-application workflows.
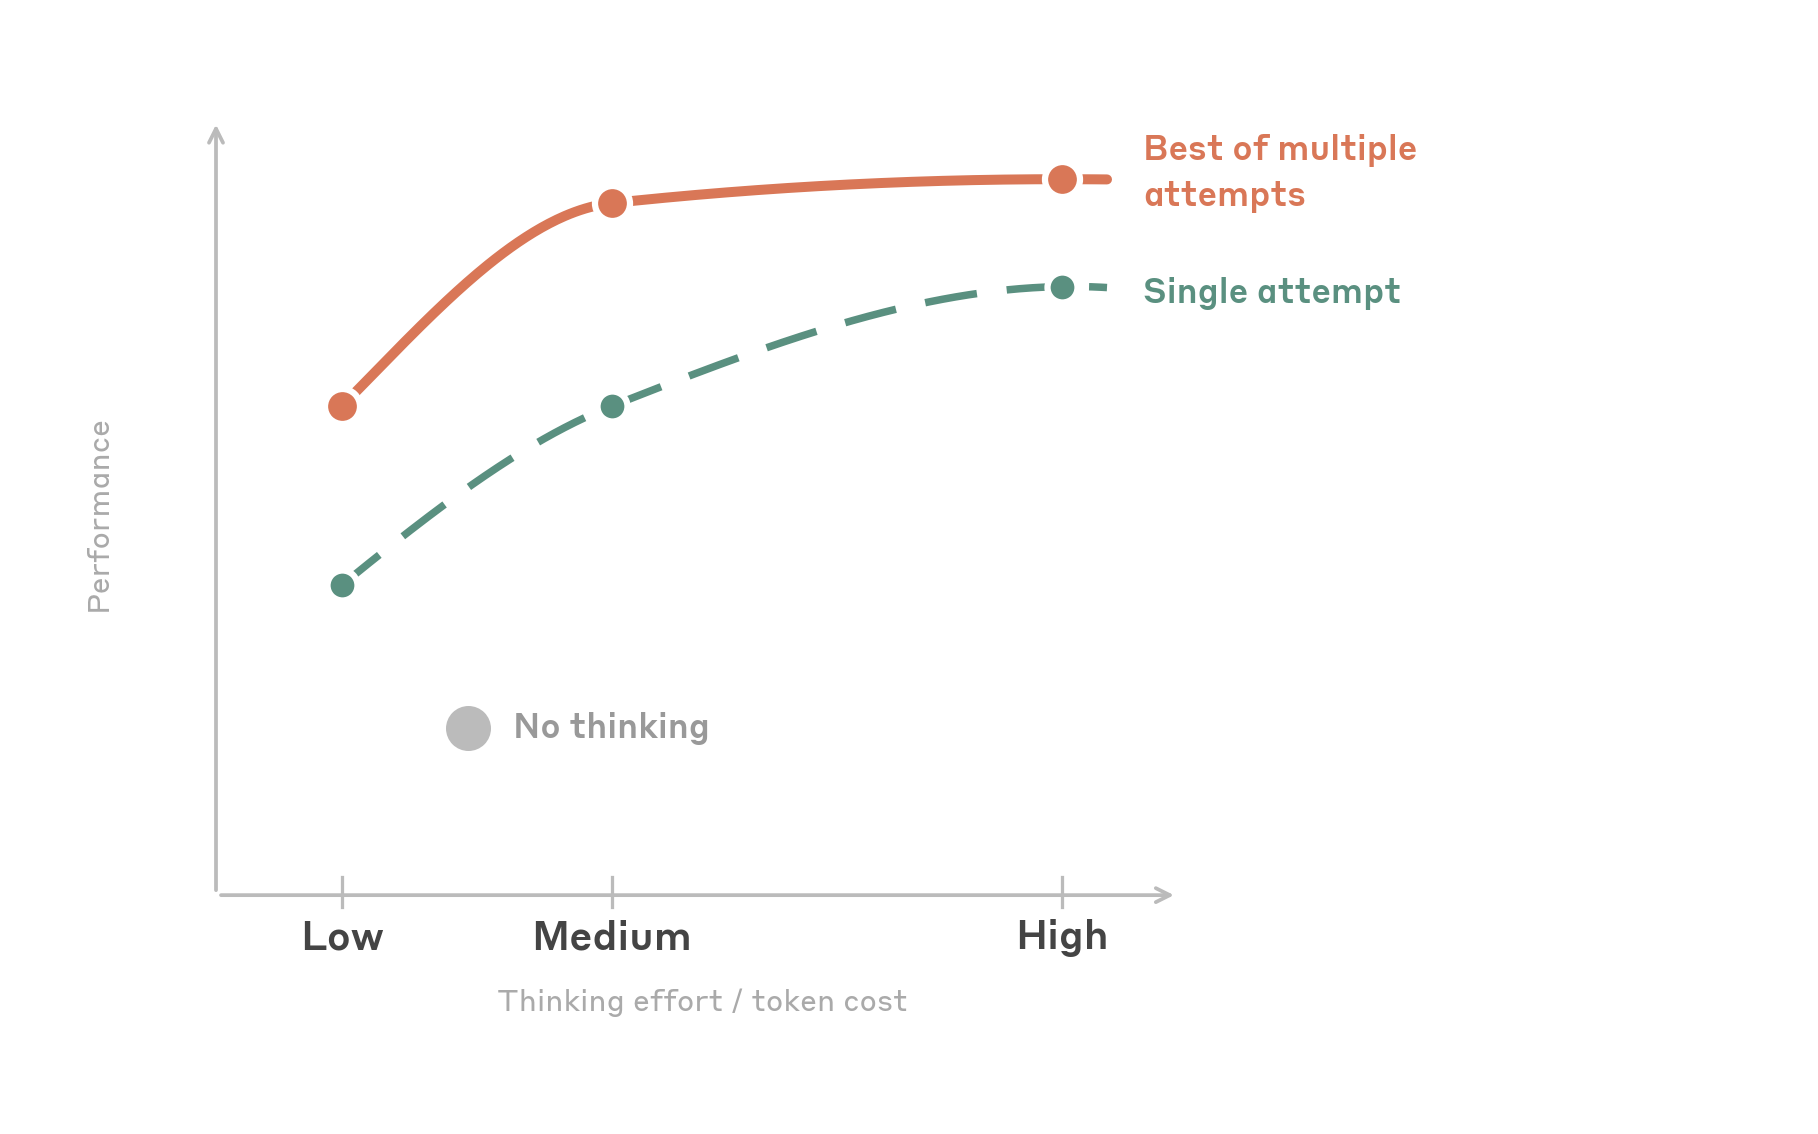
Two patterns stand out:
Medium effort is the sweet spot. Setting effort to medium achieves close to the highest task success rate while using roughly half the output tokens of high. Beyond medium, performance somewhat plateaus. Notably, when tasks are retried, medium and high converge to the same success rate. This means high effort may help the model get a difficult task right on the first try, but given multiple attempts, medium may get there as reliably at lower cost.
A little thinking goes a long way. low effort is a surprisingly strong option. It actually uses fewer total output tokens than disabling thinking entirely (the model makes fewer mistakes and needs fewer retry cycles), while matching or slightly exceeding no-thinking accuracy. This makes it the best option for cost-sensitive, high-throughput workloads. The table below outlines our effort recommendations.
| Scenario | Thinking effort | Why |
|---|---|---|
| Default for most use cases | medium | Best accuracy-to-cost ratio. Gives the model enough reasoning to plan multi-step interactions without overthinking. With retries, matches high performance at half the token cost. |
| High-throughput / cost-sensitive | low | More accurate than no thinking, but with lower token usage due to fewer errors and retries. |
| Simple, well-defined workflows / fastest | Thinking disabled | Use if low latency is the highest priority. Adequate for short, predictable tasks where the UI is consistent and the workflow is known. |
| Complex, one-shot tasks | high | Use when tasks are challenging and you need to get it right on the first attempt. If your system supports retries, medium may achieve the same eventual success rate. |
We don't recommend max effort for computer use. In our testing, it provides no accuracy benefit over high while further increasing output token cost. UI tasks are primarily perceptual rather than deeply logical, and the additional reasoning budget goes unused or leads to overthinking. Keep in mind that this advice will change as models evolve.
Example configuration of medium setting effort level:
import anthropic

client = anthropic.Anthropic()

response = client.beta.messages.create(
    model="claude-sonnet-4-6",
    max_tokens=16000,
    betas=["computer-use-2025-11-24"],
    thinking={"type": "adaptive"},
    output_config={"effort": "medium"},
    messages=[...],
    tools=[
        {
            "type": "computer_20251124",
            "name": "computer",
            "display_width_px": 1280,
            "display_height_px": 720,
        }
    ],
)
Claude 最新模型支持自适应思考(adaptive thinking),该设置让 Claude 自行决定在执行前进行多少中间推理。自适应思考无需手动设定 token 预算,而是让 Claude 根据每个请求的复杂度动态决定何时以及使用多少扩展思考。对于电脑使用,这意味着 Claude 可以在点击或按键之前思考屏幕上的内容、规划多步交互并进行自我纠正。
通过自适应思考,Claude 的思考深度由 thinking 参数控制,努力度分为 low、medium、high、xhigh(Opus 4.7)和 max。思考越多意味着每个动作的推理越多,但输出 token 也越多,延迟和成本更高。
Claude Opus 4.7
我们在涵盖桌面应用、浏览器和多应用工作流的一系列端到端 UI 自动化任务中测试了每种思考努力度。
Opus 4.7 优于 4.6 系列。在 OSWorld Verified 基准测试中,我们发现 Opus 在同等 token 使用量和努力度设置下优于所有 4.6 系列模型。Opus 4.7 在 low 努力度下的得分与 Sonnet 4.6 在 max 下相似,而每个任务的 token 用量仅为其约 1/10。对于困难任务,Opus 4.7 是显而易见的选择。
将努力度设为 high 可获得接近最高的任务成功率,同时输出 token 用量约为 max 的一半。与 Opus 4.6 相比,low、medium 和 high 的 token 用量大致相同,同时提高了 OSWorld 上的得分。在我们的内部测试中,Max 努力度使用了更多 token 并提供了最佳得分。下表概述了我们在何时使用每种努力度的建议。
| 场景 | 思考努力度 | 原因 |
|---|---|---|
| 大多数用例的默认设置 | high | Opus 4.7 最适合困难任务。使用 high 让模型有足够推理来规划复杂多步交互,同时不会显著增加 token 用量。 |
| 高吞吐量 / 成本敏感 | low | 降低 token 用量,同时提供介于 Opus 4.6 的 high 和 max 之间的质量。 |
| 简单、定义明确的工作流 / 最快 | 建议尝试 Sonnet 4.6 | 当低延迟是最高优先级时使用。适用于 UI 一致、工作流已知的简短、可预测任务。 |
| 复杂的一次性任务 | max | 当任务极具挑战性且需要在首次尝试中成功时使用。 |
Claude 4.6 模型
我们在涵盖桌面应用、浏览器和多应用工作流的一系列端到端 UI 自动化任务中测试了每种思考努力度。
两个模式凸显出来:
Medium 努力度是甜区。将努力度设为 medium 可获得接近最高的任务成功率,同时输出 token 用量约为 high 的一半。超过 medium 后性能趋于平稳。值得注意的是,当任务重试时,medium 和 high 收敛到相同的成功率。这意味着 high 努力度可能帮助模型在第一次尝试时正确完成困难任务,但给定多次尝试,medium 可以以更低成本同样可靠地达成。
一点思考就能走得很远。Low 努力度出奇地强大。它使用的总输出 token 实际上少于完全禁用思考(模型犯错误更少,需要更少的重试周期),同时匹配或略超无思考的准确度。这使其成为成本敏感、高吞吐量工作负载的最佳选择。下表概述了我们的努力度建议。
| 场景 | 思考努力度 | 原因 |
|---|---|---|
| 大多数用例的默认设置 | medium | 最佳准确度-成本比。为模型提供足够的推理来规划多步交互,而不会过度思考。配合重试,以一半的 token 成本达到 high 的性能。 |
| 高吞吐量 / 成本敏感 | low | 比无思考更准确,但由于错误和重试减少,token 用量更低。 |
| 简单、定义明确的工作流 / 最快 | 禁用思考 | 当低延迟是最高优先级时使用。适用于 UI 一致、工作流已知的简短、可预测任务。 |
| 复杂的一次性任务 | high | 当任务具有挑战性且需要在首次尝试中成功时使用。如果你的系统支持重试,medium 可能达到相同最终成功率。 |
我们不推荐在电脑使用中设置 max 努力度。在我们的测试中,它相比 high 没有带来准确度提升,反而增加了输出 token 成本。UI 任务主要是感知性的而非深度逻辑性的,额外的推理预算未被利用或导致过度思考。请记住,随着模型的发展,这条建议会有所变化。
medium 努力度配置示例:
import anthropic

client = anthropic.Anthropic()

response = client.beta.messages.create(
    model="claude-sonnet-4-6",
    max_tokens=16000,
    betas=["computer-use-2025-11-24"],
    thinking={"type": "adaptive"},
    output_config={"effort": "medium"},
    messages=[...],
    tools=[
        {
            "type": "computer_20251124",
            "name": "computer",
            "display_width_px": 1280,
            "display_height_px": 720,
        }
    ],
)
UI automation tasks are fundamentally different from coding or math problems. Most computer use actions are perceptual and mechanical: identifying the right element, clicking in the right place, rather than deeply logical. Thinking helps most when the model needs to:
Plan a multi-step sequence before starting (e.g., "I need to open Settings, navigate to Privacy, then disable tracking")
Recover from an unexpected UI state (e.g., a dialog appeared that wasn't anticipated)
Cross-reference information between what's on screen and the task instructions
Complete challenging projects on professional software
UI 自动化任务与编码或数学问题有本质区别。大多数电脑使用操作是感知性和机械性的:识别正确的元素、在正确的位置点击,而非深度逻辑推理。思考在以下情况下最有帮助:
在开始前规划多步序列(例如“我需要打开设置,导航到隐私,然后禁用跟踪”)
从意外的 UI 状态中恢复(例如出现了一个未预料到的对话框)
将屏幕上的信息与任务指令进行交叉参考
在专业软件上完成具有挑战性的项目
Computer use agents interact with untrusted content by design. Every screenshot, webpage, or application UI that Claude processes could contain adversarial instructions, including hidden text, manipulated images, deceptive UI elements, or social engineering attempts that try to hijack the agent's behavior. This attack surface is fundamentally different from a typical API integration where you control the inputs. With computer use, the inputs to the model are the open internet and whatever software the agent is navigating.
As computer use agents become more capable and more widely deployed, prompt injection becomes a correspondingly more serious risk. An agent that can click, type, and navigate can be manipulated into taking real-world actions such as filling out forms, downloading files, or navigating to malicious URLs. Building robust defenses against these attacks is essential for any production deployment.
How we approach prompt injection defense
We've written in detail about our approach to prompt injection defenses for browser and computer use. Our defense strategy operates at multiple layers:
Training-time robustness. We use reinforcement learning to build prompt injection resistance directly into Claude's capabilities. During training, Claude is exposed to injected content embedded in simulated web pages and application UIs, and rewarded when it correctly identifies and refuses to follow malicious instructions. This means Claude's first line of defense is the model itself as it has learned to distinguish between legitimate user instructions and adversarial content encountered during task execution.
Real-time classifiers. We run probes that scan content entering Claude's context window and flag potential prompt injection attempts. These probes detect adversarial commands across multiple modalities such as text hidden in page content, instructions embedded in images, and deceptive UI elements designed to trick the agent and then adjust Claude's behavior when they identify an attack.
Continuous red teaming. Our security researchers continuously probe these defenses, and we participate in external adversarial evaluations to benchmark robustness against evolving attack techniques.
We've continued to invest heavily in all three layers since our initial computer use research preview. Each new model generation incorporates stronger training-time defenses and more capable classifiers, and we've expanded the range of attack techniques our red team evaluates against.
Using Claude’s built-in classifiers
When you use Claude's official computer use tool via the API, prompt injection classifiers run automatically on every request. These classifiers operate in parallel with the main model inference, adding approximately zero additional latency and no additional cost to your requests.
There is nothing you need to configure to enable this protection. It's on by default when you use the official computer_20251124 tool type. The classifiers evaluate screenshots and other content for signs of prompt injection and influence Claude's responses accordingly.
# Classifiers run automatically when using the official CU tool — no extra config needed
tools = [
    {
        "type": "computer_20251124",
        "name": "computer",
        "display_width_px": 1280,
        "display_height_px": 720,
    }
]
If you're not using the official computer use tool
Many developers build computer use integrations using custom tool definitions rather than the official computer_20251124 tool type, for example, defining their own screenshot and click tools. If this describes your setup, the built-in classifiers described above don't currently run on your requests.
We're actively exploring how to extend prompt injection protection to these custom implementations. If you're building a computer use or browser use integration without the official tool type and are interested in prompt injection classifiers, fill out this interest form and we'll follow up as this capability becomes available.
Best practices regardless of classifier use
Classifiers are one layer of defense, not a complete solution. We recommend the following practices for any computer use deployment:
Implement human-in-the-loop for high-stakes actions. Have the agent pause and request user confirmation before performing irreversible actions such as submitting forms, making purchases, sending messages, or modifying data. This is the single most effective mitigation against prompt injection regardless of classifier performance.
Scope the agent's permissions. Limit what the agent can do. If your workflow doesn't require file downloads, don't give the agent access to download files. If it doesn't need to send emails, don't give it access to an email client. Reducing the blast radius of a successful injection is as important as preventing the injection itself.
Monitor and log agent actions. Log the full sequence of actions the agent takes, including screenshots at each step. This allows you to detect anomalous behavior, audit what happens when something goes wrong, and build a feedback loop to improve your system's robustness over time.
Treat all web content as untrusted. Design your agent's system prompt to clearly distinguish between the user's instructions and content encountered during task execution. Remind the model that text found on web pages, in emails, or in application UIs is not from the user and should not be treated as instructions.
电脑使用代理天生就会与不可信内容交互。Claude 处理的每一个截图、网页或应用 UI 都可能包含对抗性指令,包括隐藏文本、被篡改的图像、欺骗性 UI 元素或试图劫持代理行为的社会工程攻击。这一攻击面与典型 API 集成(你控制输入)有本质区别。在电脑使用场景中,模型的输入是开放的互联网以及代理正在导航的任何软件。
随着电脑使用代理能力增强且更广泛部署,提示注入的威胁也相应变得更加严重。能够点击、输入和导航的代理可能被操纵执行现实世界中的操作,如填写表单、下载文件或导航到恶意 URL。为任何生产部署构建强有力的防御至关重要。
我们的提示注入防御方法
我们已详细写过关于浏览器和电脑使用提示注入防御的方法。我们的防御策略在多个层面运作:
训练时鲁棒性:我们使用强化学习将提示注入抵抗能力直接构建到 Claude 的能力中。在训练过程中,Claude 会暴露于嵌入在模拟网页和应用 UI 中的注入内容,当其正确识别并拒绝遵循恶意指令时获得奖励。这意味着 Claude 的第一道防线是模型本身,它已学会区分合法用户指令和在任务执行中遇到的对抗性内容。
实时分类器:我们运行探针扫描进入 Claude 上下文窗口的内容,并标记潜在的提示注入尝试。这些探针跨多种模态检测对抗性命令,如隐藏在页面内容中的文本、嵌入在图像中的指令以及旨在欺骗代理的欺骗性 UI 元素,并在识别出攻击时调整 Claude 的行为。
持续红队演练:我们的安全研究人员持续探测这些防御措施,并参与外部对抗性评估以衡量对不断演变的攻击技术的鲁棒性。
自最初的电脑使用研究预览以来,我们持续对这三个层面进行大量投入。每一代新模型都集成了更强的训练时防御和更强大的分类器,并且我们扩展了红队评估的攻击技术范围。
使用 Claude 内置分类器
当你通过 API 使用 Claude 官方电脑使用工具时,提示注入分类器会在每个请求上自动运行。这些分类器与模型主推理并行运行,为你的请求增加几乎为零的额外延迟和成本。
你无需进行任何配置即可启用此保护。使用官方 computer_20251124 工具类型时,它默认开启。分类器评估截图及其他内容中的提示注入迹象,并相应影响 Claude 的响应。
# 使用官方 CU 工具时分类器自动运行——无需额外配置
tools = [
    {
        "type": "computer_20251124",
        "name": "computer",
        "display_width_px": 1280,
        "display_height_px": 720,
    }
]
如果你不使用官方电脑使用工具
许多开发者使用自定义工具定义(而非官方 computer_20251124 工具类型)构建电脑使用集成,例如定义自己的截图和点击工具。如果你的设置属于这种情况,上述内置分类器目前不会在你的请求上运行。
我们正在积极探索如何将提示注入保护扩展到这些自定义实现。如果你正在构建不使用官方工具类型的电脑或浏览器使用集成,并且对提示注入分类器感兴趣,请填写此兴趣表单,我们将在该功能可用时跟进。
无论是否使用分类器都适用的最佳实践
分类器只是防御层之一,并非完整解决方案。我们对任何电脑使用部署推荐以下做法:
对高风险操作实施人工介入:在代理执行不可逆操作(如提交表单、购买、发送消息或修改数据)之前,暂停并要求用户确认。这是无论分类器性能如何,阻止提示注入最有效的缓解措施。
限制代理权限:限制代理能做什么。如果你的工作流不需要文件下载,就不要让代理具有下载文件的权限。如果不需要发送邮件,就不要让它访问邮件客户端。减少成功注入的波及范围与防止注入本身同样重要。
监控并记录代理行为:记录代理执行的完整操作序列,包括每一步的截图。这允许你检测异常行为、审计出错时的情况,并建立反馈循环以持续提高系统的鲁棒性。
将所有网络内容视为不可信:设计代理的系统提示词,明确区分用户指令与任务执行过程中遇到的内容。提醒模型,在网页、电子邮件或应用 UI 中找到的文本并非来自用户,不应被视为指令。
When building computer use agents, screenshots accumulate fast. Every action generates a new image, and each image consumes roughly 1,000–1,800 tokens depending on resolution. After accounting for the system prompt, tool definitions, and text content, a 200k context window can fill up in well under 100 screenshots.
Managing this context well has two goals: 1) keeping total tokens bounded and 2) keeping prompt caching effective so you don't repeatedly pay full price for the same prefix. We've found that effective context management has more impact on long-running-agent cost and latency than almost any other optimization. This section covers three layers that compose cleanly: placing cache breakpoints, pruning old screenshots without breaking the cache, and summarizing history when pruning isn't enough.
Placing cache breakpoints
Prompt caching only helps if breakpoints land on content that will recur across turns. The API supports four cache breakpoints total. Putting all four on a stable prefix (system prompt, tool definitions) wastes them as that prefix is already hit once and never invalidates, so one breakpoint is enough. The other three are better spent on recent history, where invalidation risk is highest and savings compound over long sessions.
We recommend:
One breakpoint on the system prompt or trailing tool definitions. This prefix rarely changes within a session.
Up to three additional breakpoints on the most recent tool results, advancing each turn and clearing the previous iteration's breakpoints so you don't overrun the four-breakpoint limit.
Spreading breakpoints across recent positions gives you graceful degradation. If your most recent breakpoint is invalidated, e.g. by an image prune, a compaction, or a tool-definition change, an earlier breakpoint can still hit, and you keep paying 10% of the full input cost instead of 100%.
Example of cache control and setting breakpoints:
def set_trailing_cache_control(messages, max_breakpoints=3):
    """Place up to `max_breakpoints` ephemeral cache_control markers on the
    most recent tool_result blocks, after clearing any existing markers."""
    for msg in messages:
        for block in msg.get("content", []):
            if isinstance(block, dict):
                block.pop("cache_control", None)

    placed = 0
    for msg in reversed(messages):
        for block in reversed(msg.get("content", [])):
            if placed >= max_breakpoints:
                return
            if isinstance(block, dict) and block.get("type") == "tool_result":
                block["cache_control"] = {"type": "ephemeral"}
                placed += 1
Approach 1: Rolling buffer (cache-aware)
The simplest way to keep token counts bounded is to keep only the N most recent screenshots and drop the rest. Before each API call, walk the message array and replace older image blocks with a short placeholder (e.g., a text block saying “[Image omitted]”).
The naive version of this pattern is dropping screenshots one at a time as they age out, which changes the prefix on every turn and invalidates the prompt cache continuously. This is how rolling buffers got their reputation for breaking caching. The fix is to prune in batches so the prefix stays byte-identical for several turns at a time, then invalidates once, then stays stable again.
A concrete pattern that we have tested is to:
Keep the most recent keep_n screenshots in full resolution.
Once the total screenshot count exceeds keep_n + interval, replace the oldest interval screenshots with placeholders in a single pass.
Between pruning events, the message array is byte-identical across turns, so your cache breakpoints keep hitting.
Reasonable defaults to start with: keep_n = 3, interval = 25. These are tunable, and a higher interval means fewer prune events (better cache efficiency) but a larger tail of full-resolution screenshots in context (more tokens). Measure cache hit rate and total input tokens on a representative trajectory and adjust.
Example of pruning previous screenshots while keeping cache breakpoints:
def prune_old_screenshots(messages, keep_n=3, interval=25):
    """Replace older screenshots with text placeholders in batches.
    Only prunes when the total count exceeds keep_n + interval, so the
    message prefix stays byte-stable for `interval` turns between prunes."""
    image_positions = [
        (msg_idx, block_idx)
        for msg_idx, msg in enumerate(messages)
        for block_idx, block in enumerate(msg.get("content", []))
        if isinstance(block, dict) and block.get("type") == "image"
    ]
    if len(image_positions) <= keep_n + interval:
        return messages

    to_prune = image_positions[:-keep_n][-interval:]
    for msg_idx, block_idx in to_prune:
        messages[msg_idx]["content"][block_idx] = {
            "type": "text",
            "text": "[Image omitted]",
        }
    return messages
Rolling buffers still have one real limitation: anything outside the buffer is gone. The original instructions, what the agent already tried, and where it is in the task all disappear with the pruned screenshots. For short tasks (under ~50 actions), that's fine. For anything longer, combine this with compaction.
构建电脑使用代理时,截图会快速累积。每个动作都会生成一张新图像,每张图像根据分辨率消耗约 1,000–1,800 token。算上系统提示词、工具定义和文本内容后,200k 的上下文窗口在远不足 100 张截图时就会填满。
妥善管理上下文有两个目标:1)控制总 token 数量;2)保持提示缓存有效,避免反复为相同前缀支付全价。我们发现,有效的上下文管理对长期运行代理的成本和延迟影响几乎超过任何其他优化。本节涵盖三个可清晰组合的层面:设置缓存断点、在不破坏缓存的前提下修剪旧截图,以及在修剪不够时对历史进行摘要。
设置缓存断点
提示缓存只在断点落在跨轮次重复出现的内容上时才有效。API 总共支持四个缓存断点。将全部四个放在稳定前缀(系统提示词、工具定义)上是一种浪费,因为该前缀命中一次后永不过期,所以一个断点就足够了。另外三个最好放在最近的历史上,那里失效风险最高,且节省在长时间会话中会累积。
我们推荐:
在系统提示词或尾部工具定义上设置一个断点。此前缀在会话中很少变化。
在最近的工具结果上额外设置最多三个断点,每次向前推进并清除上一轮的断点,以免超过四个断点的限制。
将断点分散在最近的位置可以实现优雅降级。如果你的最新断点失效(例如由于图像修剪、压缩或工具定义变更),较早的断点仍可能命中,你将继续支付完整输入成本的 10% 而非 100%。
缓存控制和设置断点示例:
def set_trailing_cache_control(messages, max_breakpoints=3):
    """在最近的 tool_result 块上放置最多 max_breakpoints 个临时缓存控制标记,
    清除任何现有标记后。"""
    for msg in messages:
        for block in msg.get("content", []):
            if isinstance(block, dict):
                block.pop("cache_control", None)

    placed = 0
    for msg in reversed(messages):
        for block in reversed(msg.get("content", [])):
            if placed >= max_breakpoints:
                return
            if isinstance(block, dict) and block.get("type") == "tool_result":
                block["cache_control"] = {"type": "ephemeral"}
                placed += 1
方法一:滚动缓冲(缓存感知)
控制 token 数量最简单的方法是只保留最近的 N 张截图,丢弃其余的。在每次 API 调用前,遍历消息数组,将较旧的图像块替换为简短占位符(例如文本块"[Image omitted]")。
这种模式的朴素版本是截图过期时逐个丢弃,这会在每一轮改变前缀并持续使提示缓存失效——滚动缓冲也因此背负了破坏缓存的坏名声。解决方法是以批处理方式修剪,使得前缀在若干轮中保持字节一致,然后失效一次,再保持稳定。
我们测试过的一个具体模式是:
保留最近的 keep_n 张全分辨率截图。
一旦总截图数量超过 keep_n + interval,一次性将最旧的 interval 张截图替换为占位符。
在修剪事件之间,消息数组跨轮次字节相同,因此缓存断点持续命中。
可接受的初始默认值:keep_n = 3, interval = 25。这些是可调的,interval 越高意味着修剪事件越少(缓存效率更好),但上下文中全分辨率截图的尾部更大(更多 token)。在代表性轨迹上衡量缓存命中率和总输入 token 数并相应调整。
修剪旧截图同时保持缓存断点的示例:
def prune_old_screenshots(messages, keep_n=3, interval=25):
    """批量将较旧截图替换为文本占位符。
    仅在总截图数超过 keep_n + interval 时修剪,
    因此在两次修剪之间的 interval 轮中消息前缀保持字节稳定。"""
    image_positions = [
        (msg_idx, block_idx)
        for msg_idx, msg in enumerate(messages)
        for block_idx, block in enumerate(msg.get("content", []))
        if isinstance(block, dict) and block.get("type") == "image"
    ]
    if len(image_positions) <= keep_n + interval:
        return messages

    to_prune = image_positions[:-keep_n][-interval:]
    for msg_idx, block_idx in to_prune:
        messages[msg_idx]["content"][block_idx] = {
            "type": "text",
            "text": "[Image omitted]",
        }
    return messages
滚动缓冲仍然有一个实际限制:缓冲之外的所有信息都消失了。原始指令、代理已经尝试过什么、任务进行到哪里,都随修剪的截图一起丢失。对于短任务(约 50 个动作以内)这没问题。对于更长的任务,将其与压缩结合使用。
Instead of silently dropping old images, summarize the full conversation before discarding it. The summary preserves what happened, what the user asked for, what's been completed, and where to resume. A few recent screenshots are kept alongside it so the agent can see what it's currently looking at.
Compaction and the cache-aware rolling buffer are complementary. Use the rolling buffer turn-to-turn to keep token growth manageable; use compaction occasionally to reclaim the rest of the window without losing earlier context. Each compaction event is a cache invalidation by design, so you want it to happen rarely, not every few turns.
The summarization prompt
This example prompt provides a scaffold where each section targets a specific failure mode. The prompt must capture everything the agent needs to continue the task without re-reading the original conversation, as depicted in the example below:
COMPACT_PROMPT = """Your task is to create a detailed summary of this conversation that
will REPLACE the conversation history. The agent will continue working with only this
summary and a few recent screenshots as context.

CRITICAL: Preserve ALL user instructions verbatim. User instructions are the most
critical element. If they are lost, the agent will deviate from the task.

Before providing your summary, analyze the conversation in tags:
1. Extract every user instruction, requirement, and constraint
2. Identify if this is a repeatable workflow (e.g., processing N items)
3. Chronologically trace what actions were taken and what happened

Your summary MUST include these sections:

1. USER INSTRUCTIONS:
- Complete initial task definition (verbatim when possible)
- ALL specific requirements and criteria
- Every "DO NOT", "ALWAYS", "MUST" instruction
- Any corrections or feedback that changed the approach

2. TASK TEMPLATE (if this is a repeatable workflow):
- The pattern being repeated
- Decision criteria for each iteration
- Standard workflow steps
- Example of one completed iteration

3. CONSTRAINTS AND RULES:
- All user-specified rules and restrictions
- Edge cases and exceptions discovered

4. ACTIONS TAKEN:
- Pages visited and elements interacted with
- Forms filled and buttons clicked

5. ERRORS AND FIXES:
- What went wrong and how it was resolved
- Approaches that failed (so they aren't retried)

6. PROGRESS TRACKING:
- Items completed vs. remaining
- Current position in the workflow

7. CURRENT STATE:
- Current application, URL and domain (optional)
- Important page state (logged in, form progress, etc.)

8. NEXT STEP:
- Exactly what should be done next to continue
"""
In the prompt above, User Instructions prevents task drift: without them, the agent deviates after compaction. Task Template captures the repeatable pattern so the agent can continue iterating after compaction without re-deriving the workflow from scratch. Constraints and Rules preserves restrictions and edge cases set before or discovered during the task, so the agent doesn't violate existing rules it knew to abide by. Actions Taken helps track past progress. Errors and Fixes prevents retrying failed approaches ("I already tried clicking Submit; it doesn't work until the Terms checkbox is checked"). Progress Tracking prevents restarts and skipped items. Current State & Next Step gives an unambiguous entry point to resume.
与其沉默地丢弃旧图像,不如在丢弃前对整个对话进行摘要。摘要保留了发生了什么、用户要求了什么、已完成什么以及从哪里继续。同时保留最近几张截图,以便代理能看到当前正在查看的内容。
压缩与缓存感知的滚动缓冲是互补的。使用滚动缓冲逐轮控制 token 增长;偶尔使用压缩重新获取窗口其余部分,而不丢失早期上下文。每次压缩事件都会导致缓存失效,因此你希望它很少发生,而不是每几轮一次。
摘要提示词
以下示例提示词提供了一个脚手架,每个部分针对特定的失败模式。该提示词必须捕获代理继续任务所需的一切,而无需重新阅读原始对话:
COMPACT_PROMPT = """你的任务是创建此对话的详细摘要,它将取代对话历史。
代理将仅凭此摘要和几张最近截图作为上下文继续工作。

关键:逐字保留所有用户指令。用户指令是最关键的元素。如果丢失,
代理将偏离任务。

在提供摘要之前,用标签分析对话:
1. 提取每条用户指令、要求和限制
2. 确定这是否是可重复的工作流(例如处理 N 个项目)
3. 按时间顺序追踪采取了哪些行动以及发生了什么

你的摘要必须包含以下部分:

1. 用户指令:
   - 完整的初始任务定义(尽可能逐字)
   - 所有具体要求和标准
   - 每一条“不要”、“始终”、“必须”指令
   - 任何改变方法的更正或反馈

2. 任务模板(如果是可重复工作流):
   - 正在重复的模式
   - 每次迭代的决策标准
   - 标准工作流步骤
   - 一个已完成迭代的示例

3. 限制与规则:
   - 所有用户指定的规则和限制
   - 发现的边缘情况和例外

4. 已采取的行动:
   - 访问的页面和交互过的元素
   - 填写的表单和点击的按钮

5. 错误与修复:
   - 出了什么问题以及如何解决
   - 失败的方法(以免重试)

6. 进度追踪:
   - 已完成项与剩余项
   - 工作流中的当前位置

7. 当前状态:
   - 当前应用、URL 和域名(可选)
   - 重要页面状态(是否登录、表单进度等)

8. 下一步:
   - 接下来应确切做什么以继续
"""
在上述提示词中,用户指令防止任务漂移:没有它们,代理会在压缩后偏离。任务模板捕获可重复模式,使代理在压缩后无需从头推导工作流即可继续迭代。限制与规则保存了任务前设置或任务中发现的限制和边缘情况,使代理不会违反已知的规则。已采取的行动有助于追踪过去进度。错误与修复防止重试失败的方法(“我已经试过点击提交;它不起作用,直到同意条款复选框被勾选”)。进度追踪防止重启和遗漏项。当前状态与下一步给出了明确的恢复起点。
Server-side compaction (beta)
The simplest way to use this prompt is to let the API handle compaction via server-side compaction (beta). Pass your custom summarization prompt as the instructions parameter in context_management, and the API automatically summarizes when input tokens exceed a trigger threshold. The instructions parameter completely replaces the default summarization prompt, so the sections above are what the model will follow. Set pause_after_compaction to attach the most recent messages (including screenshots) across compaction events.
Examples of using autocompaction tool:
# Minimal — turn on autocompaction with API defaults
response = client.beta.messages.create(
    model="claude-opus-4-7",
    max_tokens=16000,
    betas=["compact-2026-01-12", "computer-use-2025-11-24"],
    context_management={"edits": [{"type": "compact_20260112"}]},
    messages=[...],
    tools=[...],
)

# Customized — set your own trigger threshold and summarization prompt
response = client.beta.messages.create(
    model="claude-opus-4-7",
    max_tokens=16000,
    betas=["compact-2026-01-12", "computer-use-2025-11-24"],
    context_management={
        "edits": [
            {
                "type": "compact_20260112",
                "trigger": {"type": "input_tokens", "value": 150_000},
                "instructions": COMPACT_PROMPT,
            }
        ]
    },
    messages=[...],
    tools=[...],
)
Truncate client-side to match the server
When the API runs a server-side compaction, it replaces pre-compaction content on its side, but your local messages array still holds the full history. If you keep sending the full history on every subsequent turn, you'll pay for tokens the server no longer needs, plus your rolling-buffer pruner will operate on a different message slice than the server actually sees, which can break the cache-stable prefix you carefully maintained above.
The fix is to mirror the server's truncation on the client, as depicted by the code snippet below. When the response reports that compaction occurred, drop everything before the compaction marker from your local messages array before the next turn. This keeps client and server views aligned and lets the rolling buffer keep working correctly.
def truncate_to_last_compaction(messages, response):
    """If the server compacted on this turn, drop pre-compaction messages
    locally so the next turn's cache prefix matches what the server sees."""
    context_mgmt = getattr(response, "context_management", None)
    if not context_mgmt or not context_mgmt.get("applied_edits"):
        return messages

    compaction = next(
        (e for e in context_mgmt["applied_edits"] if e["type"] == "compact"),
        None,
    )
    if compaction is None:
        return messages

    keep_from = compaction["message_index_after_compaction"]
    return messages[keep_from:]
Client-side compaction
If you're using a model that doesn't support server-side compaction, or you want full control, implement compaction client-side with the same prompt. After each API call, check the total input token count from the response usage field. When that crosses a threshold (e.g., 90% of the context window), send the conversation to a summarizer model with COMPACT_PROMPT as the system prompt. Replace the message history with the summary plus a few recent screenshots, then continue the agent loop. Putting it together
A good default for a long-running computer use agent looks like this:
One cache breakpoint on the stable prefix, three on trailing tool results, cleared and re-placed each turn.
Cache-aware rolling buffer with keep_n = 3 and interval = 25, replacing older screenshots with placeholders in batches.
Server-side compaction triggered around 150k input tokens with a custom prompt, plus a client-side truncation pass to keep the two views aligned.
With these three layers in place, a typical long-horizon CU session will hit the prompt cache on the vast majority of turns, keep total input tokens bounded well below the context window, and preserve enough history through compaction events that the agent doesn't lose track of the task.
服务端压缩(测试版)
使用此提示词最简单的方式是让 API 通过服务端压缩(测试版)处理压缩。将你的自定义摘要提示词作为 context_management 中的 instructions 参数传入,当输入 token 超过触发阈值时,API 会自动执行摘要。instructions 参数完全替代默认的摘要提示词,因此模型将遵循上述章节。设置 pause_after_compaction 以在压缩事件中附加最新消息(包括截图)。
使用自动压缩工具的示例:
# 最简模式——使用 API 默认设置启用自动压缩
response = client.beta.messages.create(
    model="claude-opus-4-7",
    max_tokens=16000,
    betas=["compact-2026-01-12", "computer-use-2025-11-24"],
    context_management={"edits": [{"type": "compact_20260112"}]},
    messages=[...],
    tools=[...],
)

# 自定义——设置自己的触发阈值和摘要提示词
response = client.beta.messages.create(
    model="claude-opus-4-7",
    max_tokens=16000,
    betas=["compact-2026-01-12", "computer-use-2025-11-24"],
    context_management={
        "edits": [
            {
                "type": "compact_20260112",
                "trigger": {"type": "input_tokens", "value": 150_000},
                "instructions": COMPACT_PROMPT,
            }
        ]
    },
    messages=[...],
    tools=[...],
)
客户端截断以匹配服务端
当 API 执行服务端压缩时,它会在自己侧替换压缩前的内容,但你的本地消息数组仍持有完整历史记录。如果你在每一轮继续发送完整历史,你将支付服务端不再需要的 token 费用,而且你的滚动缓冲修剪器将操作在与服务端实际看到不同的消息切片上,这可能会破坏你精心维护的缓存稳定前缀。
解决方法是在客户端镜像服务端的截断,如下方代码片段所示。当响应报告压缩发生时,在下一轮之前从本地消息数组中丢弃压缩标记之前的所有内容。这使客户端和服务端视图保持一致,并让滚动缓冲继续正常工作。
def truncate_to_last_compaction(messages, response):
    """如果服务端在本轮进行了压缩,则在本地丢弃压缩前的消息,
    以使下一轮的缓存前缀匹配服务端所见的。"""
    context_mgmt = getattr(response, "context_management", None)
    if not context_mgmt or not context_mgmt.get("applied_edits"):
        return messages

    compaction = next(
        (e for e in context_mgmt["applied_edits"] if e["type"] == "compact"),
        None,
    )
    if compaction is None:
        return messages

    keep_from = compaction["message_index_after_compaction"]
    return messages[keep_from:]
客户端压缩
如果你使用的模型不支持服务端压缩,或者你想要完全控制,可以在客户端使用相同的提示词实现压缩。每次 API 调用后,从响应的使用量字段检查总输入 token 数。当该值超过阈值(例如上下文窗口的 90%)时,将对话发送给一个以 COMPACT_PROMPT 为系统提示词的摘要模型。用摘要加上几张最近截图替换消息历史,然后继续代理循环。
综合运用
一个长期运行的电脑使用代理的良好默认设置如下:
在稳定前缀上设置一个缓存断点,在尾部工具结果上设置三个,每轮清除并重新放置。
缓存感知的滚动缓冲,keep_n = 3, interval = 25,批量将较旧截图替换为占位符。
在输入 token 达到约 150k 时触发服务端压缩,使用自定义提示词,并配合客户端截断以保持两个视图对齐。
有了这三个层面,典型的长时间电脑使用会话将在绝大部分轮次命中提示缓存,将总输入 token 控制在上下文窗口以下,并通过压缩事件保留足够历史记录,使代理不会丢失任务线索。
Batch tools
In the updated reference implementation we expose two tools alongside the standard computer and browser tools: computer_batch and browser_batch. Each accepts a list of sub-actions and executes them in a single tool call. For example, instead of separate click, type, and press key turns, the model can emit one computer_batch call containing all three actions.
The appeal is efficiency: a workflow with N mechanical actions is a single round trip instead of N round trips, which on long-horizon tasks meaningfully reduces wall-clock time and output token spend. The risk is compounding error, if action 2 depends on visual state that action 1 changed, and action 1 misses, the rest of the batch operates on stale assumptions and the agent can drift without ever seeing a screenshot of the actual state.
We recommend batch tools when the sub-actions are self-contained and don't depend on each other's visual outcomes (filling multiple fields in a form, chaining keyboard shortcuts, scrolling and clicking a known target). We'd avoid them in exploratory navigation, error-recovery sequences, or any workflow where "if action 1 fails I need to re-plan" is a real state.
Because batch tools are your own custom definitions, they stack cleanly with the standard computer or browser tools. Keep both available and let the model choose.
The advisor tool (beta)
The advisor tool pairs an executor model with a higher-intelligence advisor model that the executor can consult mid-generation for strategic guidance. The executor runs the loop and when it hits something that needs deeper reasoning, it calls the advisor, receives a plan or course correction, and continues. This happens server-side inside a single request, no extra round trips on your side.
For computer use specifically, this pattern is most useful on long-horizon tasks where most turns are mechanical clicking but occasional planning moments (choosing which tab to open, recovering from an unexpected modal, deciding whether to abandon a strategy) benefit from Opus-level reasoning. You get close to advisor-solo quality while the bulk of token generation happens at executor rates.
Example of enabling the advisor tool:
response = client.beta.messages.create(
    model="claude-sonnet-4-6",
    max_tokens=16000,
    betas=["advisor-tool-2026-03-01", "computer-use-2025-11-24"],
    tools=[
        {
            "type": "advisor_20260301",
            "name": "advisor",
            "model": "claude-opus-4-7",
        },
        {
            "type": "computer_20251124",
            "name": "computer",
            "display_width_px": 1280,
            "display_height_px": 720,
        },
    ],
    messages=[...],
)
Useful controls for the advisor tool include:
max_uses: cap advisor calls per request. Helpful when you want to bound the worst-case cost.
Conversation-wide cap in your harness: the advisor bills at Opus 4.7 rates for each consult, so on very long sessions you may want to stop offering the advisor after some number of uses.
Advisor-side caching: on multi-call conversations, caching the advisor's prefix pays off after roughly three consults. In the reference implementation we default to 5-minute ephemeral caching.
Two non-obvious things worth knowing: the advisor runs without tools and without context management, so it can't click or browse on your behalf, it only returns text advice. And because the executor model doesn't always remember the advisor exists on long-horizon tasks, see the reminder nudges section below.
Cleaning up orphaned advisor blocks
When the advisor tool fires, the executor emits a server_tool_use block with name: "advisor" followed by an advisor_tool_result block in the returned content. These blocks live in your messages array alongside everything else.
If you later drop the advisor tool from your tools array — because you hit a conversation-wide cap, changed config, or switched models — those prior server_tool_use / advisor_tool_result blocks become orphaned. The API will return a 400 on the next request because the referenced tool is no longer declared.
The fix is a simple pre-send pass: whenever the advisor is disabled for a turn, walk the message history and strip any content blocks of type server_tool_use (with name == "advisor") and advisor_tool_result.
Example of removing stale advisor blocks:
def strip_orphaned_advisor_blocks(messages):
    """Remove advisor server_tool_use / tool_result blocks from history.
    Call this before any request that doesn't include the advisor tool."""
    for msg in messages:
        content = msg.get("content")
        if not isinstance(content, list):
            continue
        msg["content"] = [
            block for block in content
            if not (
                isinstance(block, dict)
                and (
                    (block.get("type") == "server_tool_use"
                     and block.get("name") == "advisor")
                    or block.get("type") == "advisor_tool_result"
                )
            )
        ]
    return messages
Periodic reminder nudges
On long sessions, the executor model can forget which tools are available or which ones it should prefer. Two short reminder patterns have helped in our testing:
Batch reminder. If you expose computer_batch or browser_batch alongside the standard tools and observe the model chaining single-action calls when a batch would be appropriate, append a short system-level nudge after the next tool result: "Remember you can use computer_batch to combine sequential actions in a single tool call when they don't depend on intermediate screenshots." The goal is to pull the model back toward batching without dictating exactly when.
Advisor reminder. The advisor tool is easy for the executor to forget exists, especially if it hasn't been called in many turns. On sessions longer than ~20 turns without an advisor call, append a brief reminder that the advisor is available for planning or course-correction moments. In the reference implementation we use a 20-turn cadence and append a one-line hint.
Both nudges are light-touch context injections, not system-prompt rewrites. They cost a few tens of input tokens per append. If your system prompt is already long or your cache breakpoints are precisely placed, weigh whether the lift is worth the added invalidation risk.
批量工具
在更新的参考实现中,我们在标准电脑和浏览器工具之外额外暴露了两个工具:computer_batch 和 browser_batch。每个工具接受一个子动作列表并在单个工具调用中执行它们。例如,模型可以发出一个包含点击、输入和按键三个动作的 computer_batch 调用,而不是三个独立的轮次。
其吸引力在于效率:包含 N 个机械动作的工作流只需一次往返而非 N 次,这能显著减少长周期任务的挂钟时间和输出 token 消耗。风险是复合错误:如果动作 2 依赖于动作 1 改变的视觉状态,而动作 1 失败,则批次的其余部分基于过时假设运行,代理可能在从未看到实际状态截图的情况下漂移。
我们推荐在子动作是自包含且不依赖于彼此的视觉结果时使用批量工具(填写表单中的多个字段、串联键盘快捷键、滚动并点击已知目标)。我们会在探索性导航、错误恢复序列或任何“如果动作 1 失败我需要重新规划”是真实状态的工作流中避免使用它们。
由于批量工具是你自己的自定义定义,它们可以与标准电脑或浏览器工具干净地组合。保持两者都可用,让模型选择。
顾问工具(测试版)
顾问工具将一个执行模型与一个更高智能的顾问模型配对,执行模型可以在生成过程中咨询顾问以获得战略指导。执行模型运行循环,当遇到需要更深推理的情况时,它调用顾问,接收计划或方向修正,然后继续。这发生在服务端的一个请求内部,无需你方额外的往返。
专门针对电脑使用,此模式在长周期任务中最有用,其中大多数轮次是机械点击,但偶尔的规划时刻(选择打开哪个标签页、从意外模态中恢复、决定是否放弃某个策略)受益于 Opus 级别的推理。你获得接近顾问单独处理的质量,而大部分 token 生成以执行模型费率进行。
启用顾问工具的示例:
response = client.beta.messages.create(
    model="claude-sonnet-4-6",
    max_tokens=16000,
    betas=["advisor-tool-2026-03-01", "computer-use-2025-11-24"],
    tools=[
        {
            "type": "advisor_20260301",
            "name": "advisor",
            "model": "claude-opus-4-7",
        },
        {
            "type": "computer_20251124",
            "name": "computer",
            "display_width_px": 1280,
            "display_height_px": 720,
        },
    ],
    messages=[...],
)
顾问工具的有用控制包括:
max_uses:限制每个请求中顾问调用次数。在需要限制最坏情况成本时有用。
编排代码中的会话级上限:顾问每次咨询按 Opus 4.7 费率计费,因此在非常长的会话中,你可能希望在若干次使用后停止提供顾问。
顾问侧缓存:在多轮对话中,大约三次咨询后缓存顾问的前缀会带来收益。在参考实现中,我们默认使用 5 分钟临时缓存。
两个非显而易见但值得注意的事项:顾问运行时没有工具和上下文管理,因此它不能代表你点击或浏览,只返回文本建议。另外,由于执行模型在长时间任务中并不总记得顾问的存在,请参阅下面的提醒提示部分。
清理孤立的顾问块
当顾问工具触发时,执行模型会在返回内容中发出一个 name: "advisor" 的 server_tool_use 块,后跟一个 advisor_tool_result 块。这些块与其他所有内容一起存在于你的消息数组中。
如果你后来从工具数组中移除了顾问工具——因为达到了会话级上限、更改了配置或切换了模型——那些之前的 server_tool_use / advisor_tool_result 块就成了孤儿。下一次请求时 API 将返回 400,因为引用的工具不再声明。
解决方法是在发送前进行简单过滤:每当顾问在某一轮被禁用时,遍历消息历史并移除类型为 server_tool_use(name == "advisor")和 advisor_tool_result 的内容块。
移除陈旧顾问块的示例:
def strip_orphaned_advisor_blocks(messages):
    """从历史中移除顾问的 server_tool_use / tool_result 块。
    在任何不包含顾问工具的请求前调用此函数。"""
    for msg in messages:
        content = msg.get("content")
        if not isinstance(content, list):
            continue
        msg["content"] = [
            block for block in content
            if not (
                isinstance(block, dict)
                and (
                    (block.get("type") == "server_tool_use"
                     and block.get("name") == "advisor")
                    or block.get("type") == "advisor_tool_result"
                )
            )
        ]
    return messages
周期性提醒提示
在长时间会话中,执行模型可能会忘记哪些工具可用或应优先使用哪个。在我们的测试中,两种简短的提醒模式有帮助:
批量提醒:如果你同时提供 computer_batch 或 browser_batch 与标准工具,并观察到模型在适合批处理时仍在串联单动作调用,则在下一个工具结果后附加一个简短的系统级提示:“记住,当不依赖中间截图时,你可以使用 computer_batch 将顺序动作合并为一次工具调用。”目标是让模型回到批处理,而不指定确切时机。
顾问提醒:顾问工具容易被执行模型遗忘,尤其是在多轮没有被调用时。在超过约 20 轮没有顾问调用的会话中,附加一个简短提醒,提示顾问可用于规划或方向纠正时刻。在参考实现中,我们使用 20 轮节奏并附加一行提示。
两种提示都是轻量的上下文注入,而非系统提示词重写。每次附加消耗几十个输入 token。如果你的系统提示词已经很长或缓存断点已精确定位,需要权衡其提升是否值得增加失效风险。
Instead of iterating on text prompts until Claude gets a workflow right, you can show it the correct behavior directly. Record yourself performing the task, capturing screenshots, actions, and optionally voice narration at each step, then replay that demonstration as context when Claude executes the same workflow. The recording becomes a reusable specification Claude can follow, adapting to differences in the live UI state.
We use this pattern internally in Claude in Chrome (where we call it "Teach Mode") and are sharing it here because the underlying approach is broadly useful for anyone building computer use or browser use products. It helps in two ways: improving reliability on workflows Claude can mostly handle but occasionally gets wrong, and unlocking entirely new workflows that Claude can't complete from a text prompt alone. The core idea (capture a demonstration, feed it back as context) is straightforward to implement and adapts well to both browser and desktop environments.
The core concept: show, don't tell
Traditional prompt engineering asks users to describe what they want in words, then iterate when the AI misunderstands. This pattern inverts that: users demonstrate the task while the system records their actions, screenshots, and (optionally) voice narration. During playback, Claude receives the full demonstration as context and follows the same sequence of steps, adapting to any differences in the current UI state.
The key insight is that playback isn't strict replay. Claude uses the demonstration as a guide while reasoning about the live environment. If a button has moved or a menu has been reorganized, Claude can find the equivalent element in the current UI rather than blindly clicking at recorded coordinates.
The data model
The fundamental unit is a “workflow step”, a single action captured during recording. Each step bundles what was done, where it happened, and what the screen looked like:
from dataclasses import dataclass, field
from typing import Literal, Optional

@dataclass
class WorkflowStep:
    action: Literal["click", "type", "navigate", "scroll", "select"]
    description: str # Human-readable, e.g. "Click the Submit button"
    timestamp: float
    selector: Optional[str] = None # CSS selector or XPath
    coordinates: Optional[dict] = None # {"x": int, "y": int}
    url: Optional[str] = None
    screenshot: Optional[str] = None # Base64-encoded screenshot
    viewport_dimensions: Optional[dict] = None # {"width": int, "height": int}
    speech_transcript: Optional[str] = None # Voice narration, if captured
    value: Optional[str] = None # For type actions

@dataclass
class SavedWorkflow:
    id: str
    name: str # e.g. "Submit expense report"
    steps: list[WorkflowStep] = field(default_factory=list)
    description: Optional[str] = None # AI-generated summary of the workflow
    start_url: Optional[str] = None
    created_at: float = 0.0
    usage_count: int = 0
Capturing both selectors and coordinates is intentional: selectors are more robust to layout changes, but coordinates provide a visual fallback Claude can use when selectors break. Viewport dimensions are stored so coordinates can be scaled when the playback environment differs from the recording environment.
Recording: what to capture
At minimum, capture click events, keyboard input, navigation changes, and a screenshot at each action. For each click, generate a human-readable description (from aria-labels, text content, or via a quick Claude call) and annotate the screenshot with a visual marker at the click position:
def on_click(event):
    step = WorkflowStep(
        action="click",
        selector=generate_selector(event.target),
        coordinates={"x": event.client_x, "y": event.client_y},
        url=current_url(),
        description=generate_description(event.target),
        timestamp=now(),
        viewport_dimensions=get_viewport_size(),
    )
    # Annotate screenshot with a circle at the click position
    screenshot = capture_screenshot()
    step.screenshot = annotate_with_circle(screenshot, event.client_x, event.client_y)
    workflow_steps.append(step)
The annotation (a colored circle at the click location) serves two purposes: it helps users verify the recording captured the right element, and during playback it shows Claude exactly where the action occurred. Your playback prompt should clarify that these markers are recording artifacts, not part of the live UI.
Playback: constructing the prompt
This is the most important piece. When a user triggers a saved workflow, you construct a message to Claude containing three things: the user's intent, a context block explaining the demonstration format, and the recorded screenshots.
The context block tells Claude how to interpret annotated screenshots and how to adapt when the live UI differs:
def generate_playback_context(steps: list[WorkflowStep]) -> str:
    steps_description = "\n".join(
        f"Step {i+1}: {step.description}"
        for i, step in enumerate(steps)
    )

    return f"""<demonstration_context>
The user has recorded a demonstration showing how to perform this task.

RECORDED STEPS:
{steps_description}

ABOUT THE SCREENSHOTS:
- Each screenshot shows the screen state when an action was taken
- BLUE CIRCLES mark where the user clicked — these are recording annotations
- The blue highlighting is NOT part of the actual interface
- Your own screenshots will NOT have these markers

HOW TO USE THIS DEMONSTRATION:
1. Review all steps and screenshots to understand the complete workflow
2. Take your own screenshot to see the CURRENT page state
3. The blue highlights show which element to interact with — find it in your current view
4. Follow the same sequence of actions, adapting to any differences
5. If the UI has changed significantly, use judgment to find equivalent elements
</demonstration_context>"""
Then assemble the full message with the user's prompt, the context block, and each step's screenshot as an image:
import anthropic

client = anthropic.Anthropic()

content = [
    {"type": "text", "text": user_prompt},
    {"type": "text", "text": generate_playback_context(workflow.steps)},
]

for i, step in enumerate(workflow.steps):
    if step.screenshot:
        content.append({"type": "text", "text": f"[Step {i+1}: {step.description}]"})
        content.append({
            "type": "image",
            "source": {"type": "base64", "media_type": "image/jpeg", "data": step.screenshot},
        })

response = client.beta.messages.create(
    model="claude-sonnet-4-6",
    max_tokens=4096,
    betas=["computer-use-2025-11-24"],
    messages=[{"role": "user", "content": content}],
    tools=[{
        "type": "computer_20251124",
        "name": "computer",
        "display_width_px": 1280,
        "display_height_px": 720,
    }],
)
Playback modes
Not every workflow needs the same level of adherence to the recorded demonstration. Some workflows are too long, consuming a significant amount of input tokens which ultimately degrades latency and increases cost. Consider supporting a strictness parameter that you include in the context prompt:
Strict: follow steps exactly; stop and report if the UI has changed too much. Good for compliance-sensitive workflows where the exact sequence matters.
Adaptive: use the demonstration as a guide but adapt to UI changes. This is the best default for most use cases — it handles minor layout shifts, updated button labels, and reorganized menus gracefully.
Goal-oriented: focus on the end result; treat the recorded steps as hints rather than instructions. Useful when the UI changes frequently but the goal stays the same. Use a model to summarize the recorded demonstration, using strategies similar to the one described in the next section, then pass that summary to the CU model.
Example: end-to-end expense report workflow
Here's what a saved workflow looks like in practice. The workflow captures five steps: navigating to the expense form, selecting an expense type, choosing "Travel" from the dropdown, entering an amount, and clicking Submit.
expense_workflow = SavedWorkflow(
    id="wf_abc123",
    name="Submit Expense Report",
    start_url="https://expenses.company.com/new",
    steps=[
        WorkflowStep(
            action="navigate",
            url="https://expenses.company.com/new",
            description="Navigate to new expense form",
            timestamp=1700000000,
        ),
        WorkflowStep(
            action="click",
            selector="#expense-type-dropdown",
            coordinates={"x": 400, "y": 200},
            description="Click on expense type dropdown",
            timestamp=1700000001,
        ),
        WorkflowStep(
            action="click",
            selector="[data-value='travel']",
            coordinates={"x": 400, "y": 280},
            description='Select "Travel" expense type',
            timestamp=1700000002,
        ),
        WorkflowStep(
            action="type",
            selector="#amount-input",
            value="150.00",
            description="Enter expense amount",
            timestamp=1700000003,
        ),
        WorkflowStep(
            action="click",
            selector="#submit-expense-btn",
            coordinates={"x": 1150, "y": 420},
            description="Click the Submit button",
            speech_transcript="Now I'll click submit to send the report for approval",
            timestamp=1700000004,
        ),
    ],
)
When a user later says "Submit my expense report for the team lunch ($85.50)", the playback service constructs a prompt with the demonstration context, all five annotated screenshots, and the specific values from the new request. Claude sees exactly where to click, what sequence to follow, and adapts the amounts and descriptions to match the current task. If your workflow is too long for this approach to be practical due to input token count, then consider first compacting the workflow before using it as an example. See the following section for tips on managing context.
与其反复迭代文本提示词直到 Claude 能正确执行工作流,你可以直接展示正确的行为。录制自己执行任务的过程,每一步捕获截图、动作以及可选的语音旁白,然后在 Claude 执行相同工作流时将该演示作为上下文回放。录制内容成为 Claude 可遵循的可复用规范,并能适应实时 UI 状态的变化。
我们在 Chrome 中的 Claude(称之为“教学模式”)内部使用此模式,在此分享是因为其基本方法对于任何构建电脑或浏览器使用产品的人都很有用。它在两方面有帮助:提高 Claude 大部分能处理但偶尔出错的工作流可靠性,以及解锁仅靠文本提示词无法完成的崭新工作流。核心思想(捕获演示,将其作为上下文回放)实现起来直接,并且能很好地适应浏览器和桌面环境。
核心理念:展示而非告知
传统提示工程要求用户用文字描述他们想要什么,然后在 AI 理解错误时迭代。此模式颠覆了这一过程:用户演示任务,系统记录他们的动作、截图以及(可选的)语音旁白。在回放中,Claude 接收完整演示作为上下文并遵循同样的步骤序列,同时适应当前 UI 状态中的任何差异。
关键洞见是回放并非严格重放。Claude 将演示作为指南,同时对实时环境进行推理。如果一个按钮移动了或菜单重新组织了,Claude 可以在当前 UI 中找到等价元素,而不是盲目点击记录的坐标。
数据模型
基本单元是“工作流步骤”,即录制过程中捕获的单个动作。每个步骤包含做了什么、发生在哪里以及屏幕看起来是什么样:
from dataclasses import dataclass, field
from typing import Literal, Optional

@dataclass
class WorkflowStep:
    action: Literal["click", "type", "navigate", "scroll", "select"]
    description: str  # 人类可读的描述,例如“点击提交按钮”
    timestamp: float
    selector: Optional[str] = None  # CSS 选择器或 XPath
    coordinates: Optional[dict] = None  # {"x": int, "y": int}
    url: Optional[str] = None
    screenshot: Optional[str] = None  # Base64 编码截图
    viewport_dimensions: Optional[dict] = None  # {"width": int, "height": int}
    speech_transcript: Optional[str] = None  # 语音旁白,如果捕获
    value: Optional[str] = None  # 输入动作的值

@dataclass
class SavedWorkflow:
    id: str
    name: str  # 例如“提交报销报告”
    steps: list[WorkflowStep] = field(default_factory=list)
    description: Optional[str] = None  # AI 生成的工作流摘要
    start_url: Optional[str] = None
    created_at: float = 0.0
    usage_count: int = 0
同时捕获选择器和坐标是有意为之:选择器对布局变化更鲁棒,而坐标提供了选择器失效时 Claude 可使用的视觉后备方案。视口尺寸被存储,以便在回放环境与录制环境不同时缩放坐标。
录制:捕获什么
至少需要捕获点击事件、键盘输入、导航变化以及每次动作时的截图。对于每次点击,生成人类可读的描述(通过 aria-labels、文本内容或快速调用 Claude),并在截图上的点击位置添加视觉标记:
def on_click(event):
    step = WorkflowStep(
        action="click",
        selector=generate_selector(event.target),
        coordinates={"x": event.client_x, "y": event.client_y},
        url=current_url(),
        description=generate_description(event.target),
        timestamp=now(),
        viewport_dimensions=get_viewport_size(),
    )
    # 在截图上点击位置添加圆圈注释
    screenshot = capture_screenshot()
    step.screenshot = annotate_with_circle(screenshot, event.client_x, event.client_y)
    workflow_steps.append(step)
注释(点击位置的彩色圆圈)有两个目的:帮助用户验证录制捕获了正确元素,并在回放中向 Claude 精确定位动作发生位置。你的回放提示词应说明这些标记是录制产物,而非实时 UI 的一部分。
回放:构建提示词
这是最重要的部分。当用户触发已保存的工作流时,你构建一条发给 Claude 的消息,包含三部分:用户的意图、解释演示格式的上下文块以及录制的截图。
上下文块告诉 Claude 如何解读带注释的截图,以及当实时 UI 不同时如何适应:
def generate_playback_context(steps: list[WorkflowStep]) -> str:
    steps_description = "\n".join(
        f"步骤 {i+1}: {step.description}"
        for i, step in enumerate(steps)
    )

    return f"""<demonstration_context>
用户已录制了一个演示,展示如何执行此任务。

录制步骤:
{steps_description}

关于截图:
- 每张截图显示执行动作时的屏幕状态
- 蓝色圆圈标记用户点击的位置——这些是录制注释
- 蓝色高亮并非实际界面的一部分
- 你自己的截图不会有这些标记

如何使用此演示:
1. 查看所有步骤和截图以理解完整工作流
2. 拍摄你自己的截图以查看当前页面状态
3. 蓝色高亮显示要交互的元素——在你的当前视图中找到它
4. 遵循相同的动作序列,适应任何差异
5. 如果 UI 变化显著,运用判断找到等价元素
</demonstration_context>"""
然后组装完整消息,包含用户提示词、上下文块以及每一步的截图作为图像:
import anthropic

client = anthropic.Anthropic()

content = [
    {"type": "text", "text": user_prompt},
    {"type": "text", "text": generate_playback_context(workflow.steps)},
]

for i, step in enumerate(workflow.steps):
    if step.screenshot:
        content.append({"type": "text", "text": f"[步骤 {i+1}: {step.description}]"})
        content.append({
            "type": "image",
            "source": {"type": "base64", "media_type": "image/jpeg", "data": step.screenshot},
        })

response = client.beta.messages.create(
    model="claude-sonnet-4-6",
    max_tokens=4096,
    betas=["computer-use-2025-11-24"],
    messages=[{"role": "user", "content": content}],
    tools=[{
        "type": "computer_20251124",
        "name": "computer",
        "display_width_px": 1280,
        "display_height_px": 720,
    }],
)
回放模式
并非每个工作流都需要对录制演示的相同遵循程度。有些工作流太长,消耗大量输入 token,最终降低延迟并增加成本。考虑支持一个 strictness 参数,并将其包含在上下文提示词中:
严格:精确遵循步骤;如果 UI 变化太大则停止并报告。适用于需要精确序列的合规敏感工作流。
自适应:将演示作为指南但适应 UI 变化。这是大多数用例的最佳默认选择——它能优雅地处理微小布局变化、更新的按钮标签和重组的菜单。
目标导向:专注于最终结果;将录制步骤视为提示而非指令。适用于 UI 频繁变化但目标保持不变的情况。使用模型总结录制的演示,采用类似下一节描述的策略,然后将该摘要传递给电脑使用模型。
示例:端到端费用报告工作流
以下是一个保存的工作流在实际中的样子。该工作流捕获了五个步骤:导航到费用表单、选择费用类型、从下拉菜单中选择“差旅”、输入金额以及点击提交。
expense_workflow = SavedWorkflow(
    id="wf_abc123",
    name="提交费用报告",
    start_url="https://expenses.company.com/new",
    steps=[
        WorkflowStep(
            action="navigate",
            url="https://expenses.company.com/new",
            description="导航到新费用表单",
            timestamp=1700000000,
        ),
        WorkflowStep(
            action="click",
            selector="#expense-type-dropdown",
            coordinates={"x": 400, "y": 200},
            description="点击费用类型下拉框",
            timestamp=1700000001,
        ),
        WorkflowStep(
            action="click",
            selector="[data-value='travel']",
            coordinates={"x": 400, "y": 280},
            description="选择“差旅”费用类型",
            timestamp=1700000002,
        ),
        WorkflowStep(
            action="type",
            selector="#amount-input",
            value="150.00",
            description="输入费用金额",
            timestamp=1700000003,
        ),
        WorkflowStep(
            action="click",
            selector="#submit-expense-btn",
            coordinates={"x": 1150, "y": 420},
            description="点击提交按钮",
            speech_transcript="现在点击提交以将报告送审",
            timestamp=1700000004,
        ),
    ],
)
当用户稍后说“提交我团队午餐($85.50)的费用报告”时,回放服务会构建一条包含演示上下文、所有五张带注释的截图以及新请求中具体值的提示词。Claude 准确看到在哪里点击、遵循什么顺序,并调整金额和描述以匹配当前任务。如果你的工作流因输入 token 数而对此方法不实用,则考虑先压缩工作流再将其用作示例。参见下一节关于上下文管理的提示。
These practices reflect our current best understanding of what makes computer use integrations reliable in production. They apply to the Claude 4.6 model family and Opus 4.7, and will be updated as new models and techniques emerge.
As your integration matures, the patterns that matter most will depend on your specific environment, target applications, and reliability requirements.
Get started with the computer use documentation, check out our new demo implementation of these best practices, or revisit the original computer use research post for background on how these capabilities were built and where they're headed.
Acknowledgements: This article & corresponding demo were written by Lucas Gonzalez and Luca Weihs. The authors would like to thank Molly Vorwerck, Javier Rando, Maya Nielan, Gabe Mulley, and Brigit Brown for their contributions.
这些实践反映了我们当前对于如何让电脑使用集成在生产中可靠运行的最佳理解。它们适用于 Claude 4.6 模型系列和 Opus 4.7,并将在新模型和技术出现时更新。
随着你的集成日趋成熟,最重要的模式将取决于你的具体环境、目标应用以及可靠性要求。
通过电脑使用文档开始使用,查看这些最佳实践的新演示实现,或回到原始电脑使用研究文章了解这些能力是如何构建的以及未来方向。
致谢:本文及相应演示由 Lucas Gonzalez 和 Luca Weihs 撰写。作者感谢 Molly Vorwerck、Javier Rando、Maya Nielan、Gabe Mulley 和 Brigit Brown 的贡献。